Table of Contents
What are Sage CRM Metadata Tables?
Use Reporting Tables
Use SQL Identity and Next Record ID Functions
Use CRMEmailPhoneData Table
Link External Databases to Sage CRM
Link External Tables to Sage CRM
Display External Data within Sage CRM
Additional TIps and Tricks to Integrate and Display Outside Data in Sage CRM
What are Sage CRM Metadata Tables?
As you look through your Sage CRM database you will notice that almost all the tables are named in a way that makes it very easy to understand what data they store. You will also notice there are a few other tables in your database with names that may not clearly identify their purpose.
All these tables begin with the name ‘custom_’ and are used to store the system metadata. Metadata simply means data about data.
These metadata tables control how your Sage CRM looks and feels to your users. It also saves information about how your data will be displayed and stored in Sage CRM.
In this section, we will briefly describe each one of the Sage CRM metadata tables not related to reporting, which will be covered in the next section.
As always with customization work, if you plan to make any changes to your database, do so only on a test database and only after backing your database up.
The metadata tables in Sage CRM all begin with “Custom_”.
This is done so that they are easy to distinguish from the tables that contain data about your customers. Here is a list of the metadata tables and a description of the data they contain:
- Custom_Captions: This table contains the caption for your fields. This also contains all of your selection values. For example, if you add a new selection item in Sage CRM for the Communication field Actions, a new record will be added in this table. All of these records can be accessed in Sage CRM by going to Customizations then Translations.
- Custom_ContainerItems: This table contains information about your Sage CRM’s blocks. Blocks are used in CRM to group screens, list or other blocks together. Your Company and Person summary screens are examples of blocks. They each contain several different screens and the block groups them together so it’s easily displayed on a screen and you can control the order the screens are in. You can access your blocks by going to Customization, to any entity, then to the Blocks tab.
- Custom_Database: This table contains information about other databases that you have linked into your Sage CRM. If you have integration to another system that has a database backend you will be able to see the information about how Sage CRM is connecting to that database in this table. You can access them in CRM by going to Advanced Customizations then to Database and Tables.
- Custom_Edits: This table contains information about all your Sage CRM fields. This database holds all the information you see when you create a new field or when you edit an existing field. The column Colp_EntryType contains what type of field it is. Each field type has its own number in Sage CRM. For example, a Colp_EntryType with a value of 10 is a Text field in Sage CRM.
- Custom_EmailAddress: This table contains information about E-mail aliases setup in Sage CRM. To access this information in CRM, goto E-mail and Documents then E-mail Aliases.
- Custom_List: This table contains the information about each list found in Sage CRM. To access this information in Sage CRM, go to Customization, select any entity, then click on the List tab.
- Custom_Pages: This table contains information about a few specific HTLM only screens in Sage CRM. They are various screens that don’t use the normal Sage CRM formatting so they are added to this table as special pages. There is no way to access this information in Sage CRM.
- Custom_Relationships: This table contains information to assist Sage CRM with linking IDs fields for different tables. Most of the records contain Primary Key-Foreign Key relationships between the tables. There is no way to access this information in Sage CRM.
- Custom_ScreenObjects: This table contains a list of all the names and connected entities for each Screen, List, Block, Dashboard and Tab. You can access these in Sage CRM by going to Customization, select any entity and go to the corresponding tab.
- Custom_Screens: This table contains the list of fields for each screen in Sage CRM. This also contains the order the fields are in any code the field uses on a specific screen. You can access this information in CRM by going to Customization, select any entity, select the screens tab and select any screen.
- Custom_Scripts: This table contains the data for all Table scripts in Sage CRM. Table Scripts contain code that is trigged when a record for that entity is inserted, deleted or updated. You can access this information in Sage CRM by going to Customization, select any entity and select the Table Scripts tab.
- Custom_SysParams: This table holds the value for several different global administration settings for the system in Sage CRM. For example, it contains the root directory for reports and library files in Sage CRM and the setting that controls if a user can install the Outlook plugin. You can access these in several sections of the Sage CRM Administration area.
- Custom_Tables: This table contains the names and IDs for all the tables in Sage CRM. It also saves the prefix for all the tables’ fields and the name of each tables ID field. This is a very useful table to know when working on CRM directly from SQL. This information can only be access directly from the database.
- Custom_Tabs: This table contains the name, entity and action for each tab in Sage CRM. You can access this information in Sage CRM by going to Customization, select any entity and select the Tabs tab.
- Custom_Views: This table contains the information about all the views in Sage CRM. If you edit a Sage CRM view directly in SQL with the “Alter View” command, and the metadata is refreshed in CRM, your view changes will be overwritten based on what is in this table. Always modify views in Sage CRM. You can access this information in CRM by going to Customization, select any entity, and select the Views tab.
It can be a challenge when working in SQL to find information about all these metadata tables, so this outline of the tables should help you get started working directly with the Sage CRM database. Again, always remember to do any testing on a test system and always backup your database before you make any changes to the system.
Return to Top
How to Use Sage CRM Tables to Control Reporting
In this section, we will briefly describe each of the tables related to Sage CRM Reporting and for Groups.
- Custom_ReportsTables: These tables contain different type of information about the Reports and Groups found in Sage CRM.
- Custom_ReportBands: Contains the information about which view the report uses and other basic report options.
- Custom_ReportChart: Contains information about the chart a report uses.
- Custom_ReportFavorites: Keeps track of what each user’s favorite reports.
- Custom_ReportFields: Has a list of all the fields used in each report.
- Custom_ReportGroups: Hold the information about the reports Group By fields in Sage CRM.
- Custom_Reports: Contains the name title and category of the reports along with some other basic information.
- Custom_ReportSearches: Saves the information about the default and saved search criteria for different reports.
These tables store the data for both Reports and Marketing Groups. For the most part, our recommendation is that these tables are modified through the interface as the data and relationships can be complex and it’s too easy to inadvertently make a mistake.
Return to Top
How to Use the Sage CRM SQL_Identity Table
Each record in your Sage CRM database has a unique identifier called the Record ID. The SQL_identity table is a key part of making this work smoothly and it stores the next Record ID for every table in the CRM database, even the metadata tables.
The SQL_Identity table only contains two columns: the ID of a table and the ID of the next record for that table. The Table ID for each specific table can be found in the Custom_Tables table. The Next ID is a value that gets automatically incremented each time the system adds a record and then runs the stored procedure “CRM_Next_Id”.
If you add any directly to a table through any process that skips the approved Application Programming Interface (API), you MUST update the Next ID field for the corresponding table or you will run into errors in Sage CRM.
To run this stored procedure in SQL simply type:
EXEC CRM_Next_ID
in SQL Management Studios.
If you wish to view the value that is returned from this you can run the following instead:
Declare @id int EXEC @id = CRM_Next_ID
Select @id
You can use the @Id in this example to insert a record into your table with the correct ID.
Notice that each time you run this, it increments the returned number and the corresponding record in the SQL_Identity table is updated with a new Next ID.
Return to Top
How to Use the CRMEmailPhoneData table
While this table is not the primary source of phone and email data, it contains all the email and phone information for every company and person. This was done to help with views and reporting.
Every time you add, change, or delete a phone or email record in Sage CRM, this table will be updated.
You may notice two particular views, vCompanyPE and vPersonPE, are referenced in many system views now. These pull directly from the CRMEmailPhoneData table and are designed to make it easier to write queries to retrieve data, as it is designed to skip manually joining in the email/emaillink and phone/phonelink tables each time you need an email address or phone number.
These linking tables contain table IDs (SQL_Identity table) and phone and email types (‘Fax’, Buisness’, etc.) that can make the SQL joins a bit confusing, so the vCompanyPE and vPersonPE views can make life a lot easier.
The stored procedure populate_CRMEmailPhoneData is used to refresh the data in the CRMEMailPhoneData table.
When you do any importing that contains phone and email data directly in SQL, you will need to run this stored procedure once you are done. To run this stored procedure simply type:
EXEC populate_CRMEmailPhoneData
This will clear out and then repopulate the CRMEmailPhoneData based on your current phone/phonelink and email/emaillink records.
Hopefully this information will reduce the challenge of working in SQL to find information about all these metadata tables and stored procedures and help you work with your Sage CRM database.
Again, always remember to do any testing on a test system, and always backup your database before you make any changes to the system.
Return to Top
How to Link an External Database to Sage CRM
Have you ever wondered how to access or display data from external sources within Sage CRM (SageCRM)? We can show you a quick and easy way to accomplish this.
Sage CRM allows for linking unlimited external data sources of all different types, from DB2 to Oracle. You can even choose a generic ODBC data source.
For this example, we will link our local Sage 300 (Accpac) Sample Company, Inc. into Sage CRM.
To start, you must be logged into Sage CRM as the System Administrator or as a user with administrative rights.
Once logged in, select Administration from the left menu bar, then select Advanced Customization and, finally, Tables and Databases. To create a new database connection, click the New Database Connection button on the right side of the screen. At this point you will be displayed with the Database Details entry screen.
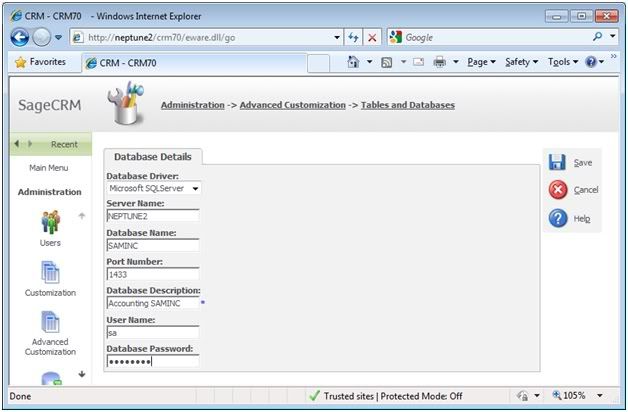
An external database link
Our local Accpac installation uses Microsoft SQL Server, so that is the option we have chosen as our Database Driver. The other driver options available are ODBC,Oracle,Real-time Data View, DB2, SQL- Server, Informix and Sybase.
Next, enter in the Server Name and Database Name; these are case insensitive.
After that, you can optionally add in the Port Number for the database. In the latest versions of Microsoft SQL Server, the default Port Number is 1433.
Next, you must enter in the Database Description; this is the unique caption that will display throughout the system. Finally, key in the Database Username and Password.
Once you have all the information entered, click the save button. You will be taken back to the list of Tables and Databases where you can see your new Database connection, now you can start adding Table connections if desired.
Check out the next section for more information about creating Table connections.
Return to Top
How to Create Table Links in External Databases with Sage CRM
In the last section, we discussed how to link external databases into Sage CRM. In this section, we’ll cover creating table links to those external database. And that’s an important step since the tables are where the data is stored!
Creating table links to external databases allows you to interact with your external data from within Sage CRM (SageCRM). Once linked, you can create Screens, Grids, Tabs, Table Scripts and read records into a Sage CRM Record Object.
- Log in to Sage CRM as the System Administrator or as a user with administrative rights.
- Select Administration from the left menu bar, then select Advanced Customization and, finally, Tables and Databases.
To create a new table connection, click the New Table Connection button on the right side of the screen. At this point you will be displayed with the Table Details entry screen.

Follow these steps to add your new table connection:
- Key in the Table Name. This must be a valid table name in the external database. If the system cannot find this table in the external database, it will return an error upon saving.
- Key in the Table Caption. This is the unique caption that will identify this specific table connection. By default, this will automatically be set to the Table Name that was keyed in. I recommend naming this field with a format of “DatabaseName.TableName” (ex. SAMINC.ARCUS). This will ensure your caption is unique. For installations where multiple Accpac companies are integrated, this is imperative.
- Choose your Database where the Table resides.
- Key in the ID Field Name. This field is optional.
Once you have all the information entered, click the save button. You will be taken back to the list of Tables and Databases where you can see your new Table connection. Now you can start using data from this table throughout the system.
Return to Top
How to Display External Data with Sage CRM
In the last section, we discussed how to create Table links to external databases in Sage CRM.
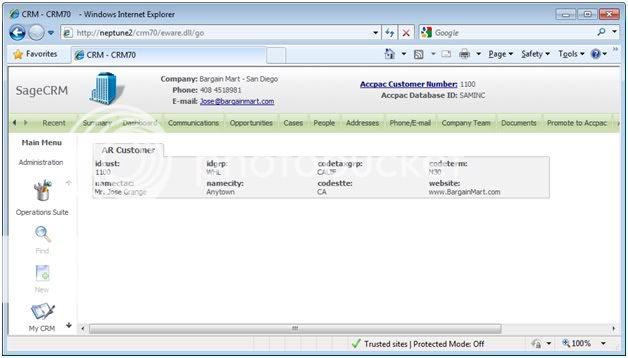
In this section, we will cover a quick and easy method to display your external table data within Sage CRM (SageCRM). We will create a Screen for the Sage 300 (Accpac) accounting system customer information by using the Sage 300 ARCUS entity and an Active Server Page to display the Screen within the context of the Company entity.
Follow the steps below to create the Screen.
- Login to Sage CRM as the System Administrator or as a user with administrative rights.
- Select Administration from the left menu bar.
- Select Customization.
- Select your external table entity from the Secondary Entities select list at the bottom of the page.
- Click on the Screens tab.
- Click the New button.
- Key in your screen definition (Screen Name, Caption and Associated View).
- Add your fields to the screen.
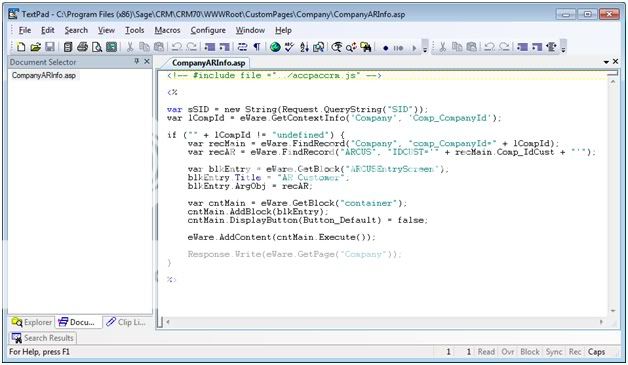
Now we will create the Active Server Page. Follow the steps below.
- Create a blank ASP file and name it appropriately. I named mine CompanyARInfo.asp and I placed it in %CRM Install Path%WWWRootCustomPagesCompany folder.
- Enter your Javascript code to display your new screen. See my screenshot as an example.
Finally, create the tab and point it to your new page.
- Select Administration from the left menu bar.
- Select Customization.
- Select the Company entity from the Primary Entities list.
- Click on the Tabs tab.
- Drill into the Company Tab Group.
- Add a new node and point it to your custom page.
Now you can view your new custom page in the system.
Return to Top
Additional TIps and Tricks to Integrate and Display Outside Data in Sage CRM
Sage CRM is robust on its own. Links to external SQL and other databases, creative URLs and other advanced integration make the solution more thorough.
As described above, to pull in external databases, System Administrators select Administration > Advanced Customization > Tables and Databases. A click of the New Database Connection button displays the Database Details entry screen.
In another advanced integration trick, administrators may connect to external sources through Web services. When they “Accept Web Request from IP Address,” they must specify the unique IP address from which WSDL (Web service definition language) files should be accessible.
Also in advanced integration in Sage CRM, you can add a tab or page that calls whatever code or source you want as a custom URL.
To whet your appetite:
- Navigate from your administrator profile > Administration > Customization > Primary Entities or Secondary Entity > the desired entity.
- From Tabs, select the pencil icon in the Customize column.
- Choose from System Act the information to be displayed.
- Label the tab in Caption and complete relevant fields.
- Add and Save.
- Select the screen you want the user to see when he or she opens the tab. Your options include Sage CRM screens and lists or those you
Related List actions establish relationships between entities–related cases, communications, companies, opportunities or people.
Entry actions open screen options from which users may create a new call, case, communication, company, lead, opportunity, person, etc.
If all of that is not enough, what about adding information into a dashboard using iFrame?
Combine the power of the Interactive Dashboard with the functionality that drives Sage CRM. Through the Interactive Dashboard you may add a URL to the page you want to load, then load it into an iFrame on the Interactive Dashboard. A shim page grabs session information from the dashboard, reads the desired custom page path from the query string and redirects to the custom page in Sage CRM.