Table of Contents
What is Sage CRM Component Manager?
Script Sage CRM Components
Create Sage CRM Components
Create Sage CRM Fields with Component Manager
Create Sage CRM Screens with Component Manager
Create Grids using Sage CRM Components
Add Tabs and Tab Groups with Component Manager
Use .NET Pages with Sage CRM Component Manager
Clone a Workflow using Component Manager
What is Sage CRM Component Manager?
The Component Manager in Sage CRM is a very useful utility. It allows for easy porting of customizations from one system to another, recording and scripting of changes to a system, scripting of workflow tree structures, and many other things. You could even write your own custom scripts to create entities, fields, tabs, views, and many other pieces of metadata in CRM.
This article is divided into multi-parts to help you utilize the Sage CRM Component Manager as fully as possible.
Recording Components
It’s important to understand that Component Manager only records customizations and metadata. It does not record actual data keyed into CRM. For a complete list of what is and what is not recorded by the Component Manager, please see the Sage CRM Developer Guide relevant to your CRM version.
Only one component can be recording at a given time. By default, all newly installed CRM systems have a component recording called “Changed”. The purpose of this component is to capture any changes made to the system from its inception and potentially use it to restore the changes if needed. Some system administrators choose to turn this component off for system speed or other reasons.
When a change is made to CRM while a component is recording, CRM automatically stores the component name on the records being added or updated. This is how CRM determines which customizations to include when scripting out a component.
We’ll dive into that topic on another article. You can see which component is recording when viewing any of the customization screens. CRM displays a blue banner message at the top of the page which lists the component name.
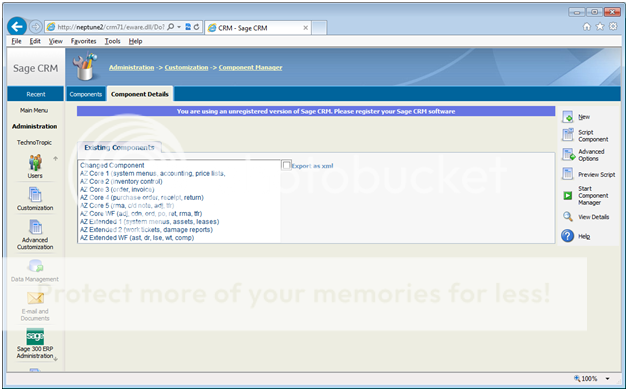
Below is a screenshot of the Component Details tab as it looks when no component is recording. Please note the list of existing components that have been installed or recorded previously on this system.
To start recording a new component, simply click the New button.
You will be prompted to key in the component name and description. A checkbox field titled “Set to be Current Component” is toggled on by default.
To continue recording an existing component, simply select the component from the list of existing components and click Start Component Manager.
CRM also allows for more precise component creation via the Advanced Options button. When clicked, you are prompted to key in the component name and description, but are also presented with other options. You can tie in:
- Other existing components.
- Changes made by specific users.
- Changes made in a specific date range.
Below is a screenshot of the Component Details tab as it looks when a component is recording. Please note the Current Component panel that displays as well as the different buttons that are available.

If you wish to change the current recording component, you simply select a component from the list of existing components and click the Set to be Current Component button. To stop the current component from running, simply click the Stop Component Manager button.
Return to Top
How to Script CRM Components
In this section, we’ll explore how to use the Sage CRM Component Manager to record your actions to create a script that can replicate your changes in a clean environment.
CRM provides a couple ways to script components. Below is a screenshot of the Component Details tab as it looks when a component is not recording.

To view the scripted changes for a component, simply highlight the component in the list and click the Preview Script button. You will be displayed with a multi-line textbox field containing the script. You are able to copy out some or all of the script if you wish.
To generate script files for a component, simply highlight the component in the list and click the Script Component button. When doing this, you are asked to confirm the component name and description. Upon clicking the Save button, two files and a folder will be generated in the CRM installation path under the inf folder:
- CRM Installation Path>inf<Component Name>.ecf
- CRM Installation Path>inf<Component Name><Component Name>.es
The ECF file is a header file which contains basic information about the component such as Description, Directory where the script file is held, Version, and other parameters. The ES file is the actual scripted component.
When viewing the Component Details tab, the Existing Components list contains scripted components that exist in the inf folder as well as non-scripted components that were recorded previously.
Scripting Workflows
Scripting workflows is extremely useful for porting workflow changes from one system to another.
Many of our clients have development environments for implementing changes before pushing them to production. Testing out workflow changes is no exception. Workflow changes can be tedious and it’s very easy to make mistakes when re-creating rules, actions, and JavaScript conditions on two systems.
The biggest thing to look out for when porting workflow changes is when altering Rule and State names.
If you change the name of a Rule or State on one system, script out the changes, and run the scripted component on another system, the script adds a new Rule or State instead of changing the existing one. That said, the benefits far outweigh the drawbacks.
To script out a workflow, drill into the workflow of your choosing and click on the Preview List button. There is no built-in automated creation of ECF and ES files for workflow changes, so you will need to create your own files.
Return to Top
How to Create Custom Sage CRM Components
In this section, we will continue our discussion by covering how to create custom components.
Custom Components
With custom written components, you can do nearly anything to your CRM installation. Here are a few examples:
- Create new entities including fields, screens, grids, tabs, views, table scripts, etc.
- Alter existing fields, screens, grids, tabs, views, table scripts, etc.
- Run direct SQL commands.
- Create folders.
- Copy files to your CRM install location.
Writing custom components does require a rudimentary knowledge of scripting; however the components themselves are not overly complex.
The Sage CRM Developer Guide is a great reference to use when writing components as it covers all available functions in the Sage CRM API. Custom functions can be written as well to carry out blocks of code due to the procedural nature of components.
Creating a New Entity
One important thing to note is that CRM tracks something called metadata, which is information about every entity, field, etc. in the system.
When inserting new entities, you need to create the physical objects in the database and then insert metadata about those new objects. That said, creating new entities is fairly simple. Here is some sample code for creating a physical entity in the database:
CreateTable(‘AZTestEntity’, ‘azte’, ‘azte_TestEntityId’, false, false, false, false);
The CreateTable function physically creates a new table in the CRM database. The function parameters are as follows:
- Entity Name – the table name.
- Field Prefix – all fields that exist in the entity will contain this prefix.
- Identity Column Name – the ID field for the entity.
- Primary Table Flag – is the entity primary? Primary entities are subject to territory security.
- System Table Flag – is the entity a system entity?
- Hidden Table Flag – is the entity hidden from the UI?
- Workflow Table Flag – is the entity enabled for workflow? A workflow ID field will be added.
After creating the physical table in the database, we now need to create metadata for the table so CRM can track it and allow for configuration within the UI. Here is some sample code for creating the table metadata:
AddCustom_Tables(‘AZTestEntity’, ”, ”, ‘AZTestEntity’, ‘azte’, ‘azte_TestEntityId’, ”, ”, ”, false);
The AddCustom_Tables function inserts a record into the Custom_Tables table. This is the table that holds all relevant data about every table in the system. The function parameters are as follows:
- Caption – This is what will display in the CRM UI instead of the Table Name.
- System Table Flag – Is the entity a system entity?
- Hidden Table Flag – Is the entity hidden from the UI?
- Table Name – The name of the physical table in the database.
- Field Prefix – All fields that exist in the entity will contain this prefix.
- Identity Column Name – The ID field for the entity.
- Primary Table Flag – Is the entity primary? Primary entities are subject to territory security.
- Progress Table Name – Progress tables are used when workflow is enabled for an entity. Some or all fields are mirrored between the main table and the progress table. The progress data is used to show workflow history displayed on the Tracking tab of the entity tab group.
- Progress Note Field Name – This is a special field used to gather notes when a record is progressed through workflow.
- Workflow Table Flag – Is the entity enabled for workflow?
Now that the physical table and metadata are inserted, you can start adding fields to your entity.
Return to Top
How to Create Sage CRM Fields with Component Manager
In this section, we will cover how to create fields using custom components. In the last section, we created a new entity by first creating the physical table in the database and then creating a metadata record (a record in the Custom_Tables table). Now, we need to create the fields.
Creating fields
When creating fields, we need to create the physical field as well as a metadata record. Here is some sample code for creating a physical entity in the database:
AddColumn(‘AZTestEntity’, ‘azte_TestTextField’, ’10’, ’20’, ‘true’, ‘false’);
The AddColumn function physically creates a new database field in the table specified. The function parameters are as follows:
- Entity Name – the table where we create the field.
- Field Name – the name of the field in the table. The field prefix must match the prefix configured for the table.
- Field Type – an integer representation of different field types in CRM. For a complete list of field types, please see the Developer Guide.
- Field Length – how many spaces or bytes will this field consume?
- Null Value Flag – are null values allowed?
- Unique Value Flag – should this field contain unique values?
After creating the physical database field in the table specified, we now need to create metadata for the field so CRM can track it and allow for configuration within the UI. Here is some sample code for creating the field metadata:
AddCustom_Edits(‘AZTestEntity’, ‘azte_TestTextField’, ’10’, ‘0’, ”, ’20’, ”, ”, ”, ”, ”, ”);
The AddCustom_Edits function inserts a record into the Custom_Edits table. This is the table that holds all relevant data about every field in the system. The function parameters are as follows:
- Entity Name – the table where the field resides.
- Field Name – the name of the field in the table.
- Field Type – an integer representation of different field types in CRM.
- Default Type – CRM has a few default types predefined. For a complete list of default types, please see the Developer Guide.
- Default Value – the default value of this field when creating new records for the entity. This is used in conjunction with the Default Type parameter.
- Entry Size – how many spaces will display in the UI?
- Lookup Family – if the Field Type has a lookup (for example, a select list), you specify the lookup name here.
- Lookup Width – the width of the lookup column.
- Required Flag – is this field required?
- Allow Edit Flag – does this field allow editing?
- Search Default Value – for certain field types (e.g. Search Select Advanced), you can specify a default search value.
- System Flag – is this field a system field (i.e. it will be hidden from the UI)?
Finally, it is recommended that you create a Translation record for your field. This will allow for the proper text to display in the UI when accessing your field. Here is some sample code for creating the translation metadata:
AddCustom_Captions(‘Tags’, ‘ColNames’, ‘azte_TextTextField’, 0, ‘Test Text Field’, ”, ”, ”, ”, ”, ”);
The AddCustom_Captions function inserts a record into the Custom_Captions table. This is the table that holds all translations (including all non-English wording) in CRM. The function parameters are as follows:
- Family Type – This is a high level type field. Some choices are: Tags, Choices, Tabs, Columns, etc.
- Family – A more specific group for captions. For example, all options in a given select list will exist under the same Family.
- Code – The literal value (field name in this case) being translated.
- Order – The order in which the captions are displayed. This is most relevant in Select lists.
- US Caption – The US English translation. This is what gets displayed in the UI.
- UK Caption – The UK English translation.
- FR Caption – The French translation.
- DE Caption – The German translation.
- ES Caption – The Spanish translation.
- DU Caption – The Dutch translation.
- JP Caption – The Japanese translation.
That’s all you need to add fields to an entity via custom component. You can repeat these steps to add other fields to your entity. Now that the physical database field, metadata and caption are all inserted, you can start adding your field to screens and grids.
Return to Top
How to Create Sage CRM Screens with Component Manager
We’ve created a new entity and added a custom field to that entity. In this section, we will continue covering the creation of custom components. Specifically, we will cover creating Screens and adding custom fields to them.
Creating Screens
Screens are made up entirely of metadata records in Sage CRM. That means there are no physical representations of these objects in the database.
The metadata for these field groupings are stored in the Custom_ScreenObjects table.
There are many kinds of screen objects stored in this table aside from Screens. Some other screen objects include Grids, Tab Groups, Filter Boxes, generic Blocks, Button Groups, and Reports/Dashboards.
Here is some sample code for creating a screen object metadata record for an entry screen in the database:
AddCustom_ScreenObjects(‘TestEntityScreen’, ‘Screen’, ‘AZTestEntity’, ‘N’, 0, ‘AZTestEntity’, ”, ”, ”, ”, ”, ”);
The AddCustom_ScreenObjects function inserts a record into the Custom_ScreenObjects table. The function parameters are as follows:
- Object Name – The name of the screen object.
- Object Type – The type of object to create.
- Entity Name – The entity in which the object will be created.
- Allow Delete – Can the object be deleted through the UI?
- Deleted – Is the object soft deleted?
- Target Table – The table or view name used to add fields to the object.
- Properties – A comma delimited list of properties (intended for Sage’s use only).
- Custom Content – Placeholder for custom scripts to be added to the object.
- Use Entity – The table from which fields can be added to the object (not needed).
- Target List – Sage internal use only.
- FTable – Sage internal use only.
- FTable Column – Sage internal use only.
Now that you have your screen object created, you can add fields to it. For Screens, we will add records to the Custom_Screens table. Here is some sample code for that:
AddCustom_Screens(‘TestEntityScreen’, 1, ‘azte_TestTextField’, 1, 1, 1, ‘N’, 0, ”, ”, ”);
The function parameters are as follows:
- Object Name – The name of the screen object where we are inserting our field.
- Order – The position of the field to be added.
- Field Name – The name of the field to be added.
- New Line – Should the field be on a new line (1 or 0)?
- Row Span – How many rows should this field take up on the screen?
- Column Span – How many columns should this field take up on the screen?
- Required – Is this field required?
- Device ID – A foreign key into the Device table.
- On Change Script – Client-side custom script that will execute upon making a change to and then leaving the field.
- Validate Script – Server-side custom script that will execute upon saving the page.
- Create Script – Server-side custom script that will execute upon loading the page.
That’s all you need to create a Screen and add fields to it via custom component. You can repeat the second step to add other fields to your Screen. In the next section, we will cover creating Grids and adding fields to them.
Return to Top
How to Create Grids and Add Fields with Sage CRM Component Manager
Over the last few sections, we reviewed the creation of custom components by creating Screens and adding custom fields to them. In this section, we will cover creating Grids and adding fields (columns) to them.
Creating Grids
As with Screens, Grids are made up entirely of metadata records in Sage CRM. There are no physical representations of these objects in the database. And again, the metadata for these column groupings are stored in the Custom_ScreenObjects table. Here is some sample code for creating a screen object metadata record for an entry screen in the database:
AddCustom_ScreenObjects(‘TestEntityGrid’, ‘List’, ‘AZTestEntity’, ‘N’, 0, ‘vAZTestEntity’, ”, ”, ”, ”, ”, ”);
In this example, I opted to use a view as the “Target Table”. This will allow me to display fields from other tables in my Grid. Now that you have your screen object created, you can add columns to it. For Grids, we will add records to the Custom_Lists table. Here is some sample code for that:
AddCustom_Lists(‘TestEntityGrid’, 1, ‘azte_TestTextField’, ”, ‘Y’, ”, ”, ‘Custom’, ”, ”, ‘MyFolder/MyCodePage.asp’, ‘azte_TestEntityID’, 0);
The function parameters are as follows:
- Grid Name – The name of the grid object where we are inserting our column.
- Order – The position of the column to be added.
- Column Name – The name of the column to be added.
- Allow Remove – Flag to note whether or not the column can be removed.
- Allow Order By – Flag to note whether or not the column is sortable.
- Order By Descending – Flag to note whether or not the column should sort in descending order by default.
- Alignment – Indicates the data justification on the column. Options include Left, Right or Center.
- Jump – Indicates whether or not this column hyper-links to another page.
- Show Heading – Flag to note whether or not the column header should display.
- Show Select as GIF – Flag to note whether or not the column should display as an image.
- Custom Action – Indicates the custom page to jump to when the Jump property is set to “Custom”.
- Custom ID Field – Indicates the field name to use as the ID field when the Jump property is set to “Custom”.
- Device ID – A foreign key into the Device table.
- Create Script – A column-level script which executes when the system renders the grid.
You can repeat this step to add other columns to your Grid.
Return to Top
Add Sage CRM Tabs and Tab Groups with Component Manager
In the last section, we covered how to create Grids and add fields (columns) to them. In this section, I will cover how to create a tab group and add a tab to it.
Tab Groups are screen objects that contain a collection of tabs. Sage CRM displays Tab Groups differently depending on the area of the system where they are being viewed. There are three main types of Tab Groups.
- Standard/Entity Tab Groups. These are the Tabs you see across the top of the screen when viewing an entity record such as a Company or Person.
- Menu Tab Groups. These are menus that display in the center of the screen for navigation purposes. The Administration section of Sage CRM uses these types of Tab Groups.
- Pop-out Menu Tab Groups. These are the pop-out menus that appear when right-clicking the icons on the left side bar in Sage CRM.
All three of these types of Tab Groups are configured nearly the same way, but look very different in the UI.
Creating a Tab Group
As you may have guessed, Tab Groups are made up entirely of metadata records in Sage CRM. There are no physical representations of these objects in the database.
The metadata is stored in the Custom_ScreenObjects table. Here is some sample code for creating a screen object metadata record for an entry screen in the database:
AddCustom_ScreenObjects(‘AZTestEntity’, ‘TabGroup’, ‘AZTestEntity’, ‘N’, 0, ‘AZTestEntity’, ”, ”, ”, ”, ”, ”);
Now that you have your Tab Group screen object created, you can add Tabs to it. For Tabs, we will add records to the Custom_Tabs table. Here is some sample code for that:
AddCustom_Tabs(‘0’, ‘0’, ’10’, EntityName, ‘Summary’, ‘customdotnetdll’, ‘AZCustomization/AZCustomization.dll’, ‘User_Per_Admin=3’, ”, 0);
The function parameters are as follows:
- Permission – This is used for internal CRM tabs only and should be set to 0.
- Per Level – This is used for internal CRM tabs only and should be set to 0.
- Order – The order in which the Tab displays in the Tab Group.
- Entity – The Tab Group this Tab belongs to.
- Caption – The text that displays for this Tab.
- Action – The action that executes when this tab is clicked.
- Custom File Name – The name of the ASP file or .Net DLL to invoke.
- Where SQL – A SQL clause that determines which users can see this tab.
- Bitmap – The name of an image file to display for this tab.
- Device ID – A foreign key into the Device table.
Now that you have your Tab Group with one or more Tabs created, you can display it in your custom code by referencing the Tab Group name.
Return to Top
How to Use .Net Pages with Sage CRM Component Manager
If you’re like us, you’re using Microsoft .Net to develop Sage CRM customizations as opposed to the old ASP approach. Using Sage CRM’s .Net SDK gives you all the benefits of using Microsoft Visual Studio including Intellisense and the .Net Framework tools and classes.
However, there are some small hurdles when using the .Net approach to Sage CRM development. We’ll cover one of them here.
Sage CRM.Net Pages
Let’s start by looking at how Sage CRM handles .Net pages. It’s pretty simple really: Sage uses action code 432 in the URL to denote a .Net page.
What is an action code?
If you are unsure and would like some solid background information on Sage CRM URLs, please read my colleague Jon Taylor’s article on the subject.
Here is an example of a .Net page URL. Please note the red highlighted text:
http://servername/crm/eware.dll/Do?SID=202781054976411&Act=432&Mode=1&CLk=T&Key0=4&Key4=1&dotnetdll=MyFolder/MyCustomDLL.dll&dotnetfunc=RunMyCrmPage&J=My%20Tab&T=User
You can see we have our action code of 432, but we also have a couple other query string parameters that CRM needs to execute the correct page:
- dotnetdll – This is pretty self-explanatory. This is the DLL where your customizations are coded. This DLL is kept in the CustomDotNet folder located at the root of your CRM installation path by default.
- dotnetfunc – This is the function inside your DLL to be executed.
Not terribly complicated, right?
Sage CRM automatically builds out these URLs on buttons, tabs and grid hyperlinks – wherever you configure them to be used. How does this relate to the Component Manager? When coding a custom component, you may need to create buttons, tabs and grid hyperlinks that call upon custom .Net DLLs.
The biggest issue is that the metadata function calls don’t always contain a parameter to pass in the .Net function to be executed in your DLL. This means you will need to supplement your metadata function calls with an additional update statement.
Here are a couple examples:
Here is a metadata function call to insert a tab under My CRM:
AddCustom_Tabs(‘0’, ‘0’, ’10’, ‘User’, ‘My Tab’, ‘customdotnetdll’, ‘MyFolder/MyCustomDLL.dll’, ‘User_Per_Admin=3’, ”, 0);
Note how there is no parameter for passing in our .Net function to execute. Here is the supplemental update statement to fix this:
RunSQL(“UPDATE Custom_Tabs SET Tabs_CustomFunction=’RunMyCrmPage’ WHERE Tabs_DeviceID IS NULL AND Tabs_Entity=’User’ AND Tabs_Caption=’My Tab'”);
Here is a metadata function call to insert a grid column with a hyperlink to a DLL page:
AddCustom_Lists(‘CommunicationList’, ‘1’, ‘Comm_Status’, ”, ‘Y’, ”, ‘CENTER’, ‘customdotnetdll’, ”, ‘Y’, ‘MyFolder/MyCustomDLL.dll’, ‘Comm_CommunicationId’, 0);
Now here is the supplemental update statement to fix it:
RunSQL(“UPDATE Custom_Lists SET GriP_CustomFunction=’RunCustomCommunicationSummary’ WHERE GriP_DeviceID IS NULL AND GriP_GridName=’CommunicationList’ AND GriP_ColName=’Comm_Status'”);
Sage may change their metadata function definitions in the future, but until then, this is the best way to handle these types of scenarios.
Stay tuned for more Sage CRM Component Manager tips and tricks!
Return to Top
How to Clone a Sage CRM Workflow Using the Component Manager
One of the most powerful tools that Sage CRM provides is the ability to create and customize a workflow. The process of creating a complex workflow might take several hours of your time, but by learning to clone a workflow, you will be able to maximize the return on your efforts.
There are a few things that you will need to do before you start.
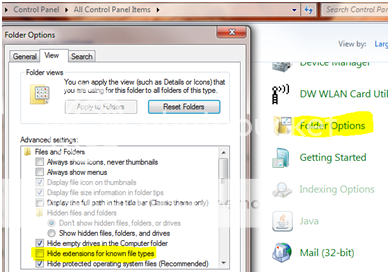
Check to make sure that you have a text editing software on your computer and that your current folder settings allow you to see file extensions. In Windows 7 Ultimate, you would navigate to Control Panel | Folder Options, after opening Folder Options you need to select the View tab and make sure that the checkbox next to “Hide extensions for known file type” is unchecked.
Once you confirmed that you have a text editor and can see file extensions, you are ready to begin the process of cloning a workflow.
The first part is creating the files and folder for the component that will load the workflow into Sage CRM.
First create a text file by right clicking on your desktop and select New | Text Document.
Once the file is created, you will name it after the workflow you wish to clone and change the extension from .txt to .ecf. When you rename the file you will receive a warning about changing the file extension but simply click yes to proceed with the next step.
After you create the .ecf file, you will create a new folder next to the file on your desktop with the same name by right clicking on your desktop and select New | Folder.
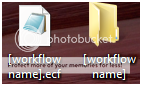
Now open the newly created folder and create a new text file inside the folder with the same name but with an .es extension.
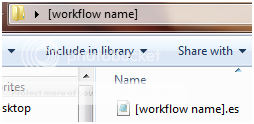
You will receive the same warning as before and click “Yes” to proceed with the next step. As a quick review, you should have two new text documents and one new folder all with the same name. The .ecf file is on the desktop while the .es file is within the newly created folder.
The second part is copying the workflow script from the existing workflow in CRM.
You need to login to Sage CRM with administrator rights and navigate to Administration| Advanced Customization| Workflow to see the list of available workflows.
Select the workflow you wish to clone and verify it is active; otherwise you will need to make it active after importing the component.
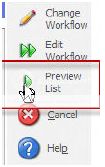
Select the Preview List button on the right hand side of the screen to see the code for the workflow you wish to clone. Click into the box where the code resides and use the “Ctrl + A” command to select all, then the “Ctrl + C” to copy the code.

You need to paste the code into the “workflow name”.es file located in the “workflow name” folder on your desktop. Make sure that you paste the code in the .es file, not the .ecf file.
The new code needs one change in order to allow you to clone the workflow. You need to edit the name of the workflow in the first line of the “workflow name”.es file to whatever you want.
![]()
After changing the workflow name in the code, you can save and close the file, but make sure that the text editor did not change the file extension.
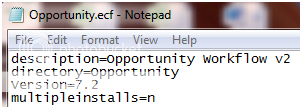
Next you need to open the “workflow name”.ecf file that you created earlier and insert the following parameters that the Component Manager needs to install the component.
- description=”new workflow name entered in code”
- directory=”entity of workflow ex:Opportunity”
- Version=”CRM version ex:7.1”
- Multipleinstalls=n
Example:
After entering in the parameters, save and close the .ecf file. Make sure that your text editor did not add or change the file extension.
You now have the necessary elements to create a Sage CRM component.
Select the “workflow name”.ecf file and the “workflow name” folder at the same time. Right click over the selected files and click the Send To | Compressed (zipped) folder option to create a new file with the name “workflow name”.zip on your desktop.

Your final step is the installation of the Sage CRM component that you just created.
Login to CRM as a user with administrative rights then navigate to Administration| Customization| Component Manager and select the Components tab. Click the Browse button, select your zip file from your desktop, and after the file directory appears in the Add Component screen select the Upload New Component button.

The component name should now appear in the Available Components Panel.
Click the component name in the Available Component list and select the Install Component button on the right hand side of the screen. You will receive a warning that the “component will overwrite changes made by other components” and click OK to continue the installation.
If the component installed correctly you should see the following message on your screen.
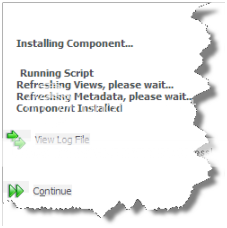
Click the continue button and navigate to Advanced Customization|Workflow to verify that your cloned workflow appears on the list.
