Table of Contents
Understand Sage CRM URLs
Conduct Proper User Acceptance Testing
Work with Sage CRM Date Fields
Control the Sage CRM Fonts and Styles
Create Parent-Child Company Relationships
Create a Sage CRM List Screen Using ASP
Add a Phone Number to Phone / Email Tab
Perform Codeless Customization using Runblock
Create a Calculated Field and Properly Display a Caption
How to Understand Sage CRM URLs
If you’ve ever experimented with customizations in Sage CRM (Sage CRM), you’ve probably noticed the cryptic URLs Sage uses when bouncing from page to page inside the application. We don’t have all the answers to every key, but we can break down what I know to be the critical parts of a Sage CRM URL.
The eWare DLL uses codes in the URL to display the correct information, and your custom pages should follow the same URL syntax if you want to see the correct data in the correct place.
Take a look at the following URL:
http://localhost/CRM/eware.dll/Do?SID=98190004832352&Act=200&Mode=1&CLk=T&Key0=1&Key1=2&Key2=2&T=Company
You only need to look at what is displayed after the “?” in the URL. For each “=” after the “?”, you will have a key before and a value after. In between each key / value pair an ampersand “&” will be displayed.
In the example above, I have the following key/value pairs.
- SID=98190004832352
- Act=200
- Mode=1
- CLk=T
- Key0=1
- Key1=2
- Key2=2
- T=Company
What Do the Sage CRM URL Keys Mean?
Let’s break them down and discuss each of these keys:
SID: Sage CRM generates a random session ID every time you login and maintains that random number until you logout. You’ll see a session ID in every URL in Sage CRM because it needs to authenticate you as a logged-in user when you click a button.
When you logout, Sage CRM kills the session and hands you a new, unique session ID the next time you login.
Act: This is short for “action” and tells Sage CRM what area you want to display. For example, act=200 takes you to the company summary tab in view mode. Act=201 takes you to the company summary tab in edit mode. Act=260 takes you to the opportunity summary in view mode. Act=263 takes you to the opportunity summary screen in edit mode.
Unfortunately, Sage does not publish the action codes, so you have to figure them out on your own if you want to use the native Sage CRM action codes.
Mode: Mode is the way Sage CRM displays data and detects what to do with the data once it has been saved or cancelled. For example, clicking “Change” on a summary screen should send Sage CRM into “edit” mode, while clicking directly on a Summary tab will show the data in “view” mode.
There are numerical associations with each of the modes. By passing one of these numbers through the mode key, you are telling Sage CRM how to display the data and what to do with it.
- View mode = 0
- Edit mode = 1
- Save mode = 2
- Pre-delete (delete confirmation screen) = 3
- Delete = 4
- Clear = 6
CLk: This key stands for “Clear Locks,” which releases any locks you have on a record once you click out of it, allowing other users to make changes to that record once you have moved somewhere else in Sage CRM.
Key: Sage CRM uses the “Key” string in the URL to tell it what record and what context you’re in. In my example above, “Key0=1&Key1=2&Key2=2”, these two would be split into three separate keys, Key0=1, Key1=2, and Key2=2.
Using the reference section we included below, you’ll see “Key0” is the dominant key (meaning the context we’re in) and “Key1” is the record of the entity we’re viewing.
So, to put it all together using the key chart below, we are in the context of the company (“Key0=1”) and looking at company with comp_companyid of 2 (“Key1=2”). The “Key2=2” part means that the primary person on this company is stored in the database where pers_personid=2.
T: The “t” key in the URL means “tab group”. In my example, “t=Company” means Sage CRM will go into the metadata and get all tabs tied to the “Company” tab group. Specifically, the data is pulled from the Custom_Tabs table. If you have multiple tab groups for an entity, you’ll need to specify which tab group you want to display, not just the name of the entity itself.
The following list is a useful guide to keys for various system areas and entities that will be referenced within Sage CRM, typically within Key0.
- PreviousDominantKey = -1;
- DominantKey = 0;
- CompanyId = 1;
- PersonId = 2;
- AddressId = 3;
- UserId = 4;
- ChannelId = 5;
- CommunicationId = 6;
- OpportunityId = 7;
- CaseId = 8;
- NoteId = 9;
- TeamId = 10;
- UserAdminId = 11;
- ChannelAdminId = 12;
- LockId = 13;
- TranslationId = 14;
- LibraryId = 15;
- ProductId = 16;
- CaseProgressId = 17;
- OpportunityProgressId = 18;
- CompanySearchKey = 19;
- PersonSearchKey = 20;
- OpportunitySearchKey = 21;
- CaseSearchKey = 22;
- CommSearchKey = 23;
- AccountId = 24;
- TargetListId = 25;
- OpportunityItemId = 26;
- WorkflowId = 27;
- WorkflowActionId = 28;
- CustomDatabase = 29;
- CustomTable = 30;
- VisitorId = 31;
- UserPrefId = 32;
- CampaignId = 33;
- WaveId = 34;
- WaveItemId = 35;
- RecurrenceId = 36;
- ForeignTableId = 37;
- DataUploadId = 38;
- MatchRulesId = 39;
- CurrencyAdminId = 40;
- ReportId = 41;
- ComponentId = 42;
- ComponentScriptId = 43;
- LeadId = 44;
- LeadSearchKey = 45;
- WorkflowStateId = 46;
- MainWorkflowId = 47;
- HelpLinkId = 48;
- TransitionId = 49;
- InstanceId = 50;
- TerritoryId = 54;
- LeadProgressId = 55;
- LeadOppoMapId = 56;
- RuleManagement = 57;
- CustomEntity = 58;
- TerritoryProfileId = 59;
- FilterProfileId = 60;
- GenericPage = 61;
- ReportSearchID = 62;
- CallID = 63;
- ForecastID = 64;
- CustomViewID = 65;
- BusinessCalendarId = 66;
- HolidaySetId = 67;
- SolutionsId = 68;
- SolutionSearchKey = 69;
- SolutionProgressId = 70;
- OrderID = 71;
- LineItemID = 72;
- ForecastHistoryID = 73;
- SLAId = 75;
- OEAdmin = 76;
- OEAdminSub = 77;
- NotificationId = 78;
- PwdSecurID = 79;
- ReportFavouriteID = 80;
- AdvancedFindID = 81;
- KeyWordSearchID = 82;
- AccountSearchKey = 83;
- OrderSearchKey = 84;
- QuoteSearchKey = 85;
- QuoteID = 86;
- Integration = 87;
This is the basic anatomy of a typical Sage CRM URL.
The URL in Sage CRM passes the parameters for eWare to build a webpage with the correct information showing in the correct context. If you are experimenting with customizations in Sage CRM, we hope this brief breakdown will help you understand the critical parts of a Sage CRM URL.
Return to Top
How to Conduct User Acceptance Testing for Sage CRM Development
Investing in a customized Sage CRM system is a smart business decision to streamline processes and increase productivity. Extensive planning goes into working with your Sage CRM consultant to discuss business processes, requirements, QA Testing, and implementation. However, the final step to a successful project is successful User Acceptance Testing (UAT).
Your Sage CRM consultant will work with project stakeholders throughout the project, but successful UAT testing is dependent on the resources of your organization. This requires planning and coordination for success.
Whether the project is large or small, the software testing life cycle (STLC) is roughly broken down into three components:
- Test Planning
- Test Design
- Test Execution
Test Planning and Test Design should begin early in the project and your Sage CRM consultant should take lead on these items. However, successful UAT planning requires the project stakeholders for your organization to actively participate in reviewing requirements, reviewing specifications, and providing feedback long before UAT begins.
Planning is an in depth process, but at a minimum the Test Plan should document the five W’s and one H: Who, What, When, Where, Why, and How.
Who will execute testing?
- Identify the resources who are most qualified in the specified business processes that are aligned with the Sage CRM entities and customizations.
- Don’t assume the identified resources will be available when UAT is scheduled to begin. Work with fellow stakeholders to communicate with management in order to coordinate and secure a commitment to assign selected resources to the UAT team.
- Additionally, discuss securing resources for the defined UAT time period.
What is being tested?
- The fundamental objective of testing is to verify the application conforms to the defined specification and requirements.
- UAT testing is testing from the viewpoint of the end user. UAT is the process of testing the implemented functionality and verifying it supports the project defined requirements and specification. For example, the “what” being tested may be as simple as verification of screen modifications or as complex as load balancing and performance testing.
Where in the Software Development Life Cycle (SDLC) will testing occur?
- Software testing should occur throughout multiple phases of the SDLC.
- Ideally testing will begin with developer unit testing, move to Quality Assurance testing, and ultimately end with UAT Testing.
- Plan where testing activities will occur throughout the project.
When will testing occur: Test-First (before code complete) or Test-Last (after code complete)
- Test cases can be written before the code is complete or after the code is complete.
- Test-Last helps users verify the functionality is working as expected.
- Test-First helps identify how the coding should work.
- UAT testing is late in the testing life cycle but UAT test cases should be defined well in advance of the start of UAT.
How will testing be completed: Automated vs. Manual
- Software testing can be performed manually or via automated testing executed by a computer.
- Automated testing is valuable in testing performance or repetitive test cases where minimum change or user input is required.
- All tests cannot be automated.
Planning is critical to the success of any project and UAT Test Planning is no exception.
Test planning is not a static process and must be updated on demand as needed, but the more detailed the planning, the more successful your UAT test experience will be.
Return to Top
How to Work with Sage CRM Date Fields
One of the most common problems with SageCRM development, as any experienced coder will tell you, is dealing with dates. In this section, we’ll show you some simple ways to ensure that you are parsing out dates from strings properly and correctly formatting dates as strings based on the user date settings.
The first thing we need to do is create a simple function that will add a leading zero to an integer if the value is less than 10 and return that integer as a string. This is used later when formatting a date as a string.
function leadingZero(x) {
    /// Examines a number to determine whether or not to add leading zeros.

    ///The integer to pad with a leading 0 ///
    if (x < 10)
        return String('0' + x);
    else
        return String(x);
    }
Now that we have a function that can handle adding the leading zero, it will aid in the readability of the functions we will write to convert a string to a date object and vice-versa. We will start with converting a string into a date object we can interact with on the server side.
function parseCRMDateString(x) {
    /// creates a date object based on the string passed in and the current users date preferences

    ///The string that represents the date to parse ///

    // Look up the current users id
    var myRecordId = eWare.GetContextInfo('user', 'user_userid');
    // Find the current users date format
    var myRecord = eWare.FindRecord('usersettings', "uset_key like 'NSet_userdateformat%' and uset_userid=" +
    myRecordId);

    // split the date string at the separators, the only separators that CRM supports are / and .
    var vals;
    if (vals.indexOf('/') > -1)
        vals = x.split('/');
    else
        vals = x.split('.');

    // create the new date object
    var resultDate = new Date();
    // Find the appropriate date format, set the date and return the newly created date object
    switch (myRecord.uset_value.toLowerCase())
        {
        case 'yyyy.mm.dd':
        case 'yyyy/mm/dd':
        resultDate.setFullYear(vals[0], vals[1] - 1, vals[2]);
        return resultDate;

        case 'd.m.yyyy':
        case 'dd.mm.yyy':
        case 'dd/mm/yyyy':
        resultDate.setFullYear(vals[2], vals[1] - 1, vals[0]);
        return resultDate;

        case 'm.d.yyyy':
        case 'mm.dd.yyyy':
        case 'mm/dd/yyyy':
        resultDate.setFullYear(vals[2], vals[0] - 1, vals[1]);
        return resultDate;

        default: // user date format was not matched default to MM/DD/YYYY
        resultDate.setFullYear(vals[2], vals[0] - 1, vals[1]);
        return resultDate;
    }
}
With the code written to parse a string into a date, the only step left is to create a function that can do the reverse and convert a date object into a properly formatted date string.
function getCRMDateString(x) {
    /// Formats a date as a string according to the current users preferences

    ///The JScript date to format as a string ///
    // Look up the current users id
    var myRecordId = eWare.GetContextInfo('user', 'user_userid');
    // Find the current users date format
    var myRecord = eWare.FindRecord('usersettings', "uset_key like 'NSet_userdateformat%' and uset_userid=" +
    myRecordId);

    // ensure the parameter is a date
    var sourceDate = new Date(x);

    // get the date, month and year from the date object
    var gotDate = sourceDate.getDate();
    var gotMonth = sourceDate.getMonth() + 1;
    var gotYear = sourceDate.getYear();

    // Build the string that holds the time
    var t = '';
    t = ' ' + (roundVal(sourceDate.getHours()) < 10 ? "0" + roundVal(sourceDate.getHours()) :
    roundVal(sourceDate.getHours())) + ':' +
    (roundVal(sourceDate.getMinutes()) < 10 ? "0" + roundVal(sourceDate.getMinutes()) :
    roundVal(sourceDate.getMinutes())) + ':' +
    (roundVal(sourceDate.getSeconds()) < 10 ? "0" + roundVal(sourceDate.getSeconds()) :
    roundVal(sourceDate.getSeconds()))

    // if the time is 00:00:00 omit it from the result
    if (t == ' 00:00:00')
        t = '';

    // declare the return variable
    var resultDate
    // find the appropriate date format and return the properly formatted string
    switch (myRecord.uset_value.toLowerCase()) {
        case 'd.m.yyyy':
        resultDate = gotDate + '.' + gotMonth + '.' + gotYear;
        return resultDate + t;

        case 'dd.mm.yyy':
        resultDate = leadingZero(gotDate) + '.' + leadingZero(gotMonth) + '.' + gotYear;
        return resultDate + t;

        case 'm.d.yyyy':
        resultDate = gotMonth + '.' + gotDate + '.' + gotYear;
        return resultDate + t;

        case 'mm.dd.yyyy':
        resultDate = leadingZero(gotMonth) + '.' + leadingZero(gotDate) + '.' + gotYear;
        return resultDate;

        case 'yyyy.mm.dd':
        resultDate = gotYear + '.' + leadingZero(gotMonth) + '.' + leadingZero(gotDate);
        return resultDate + t;

        case 'mm/dd/yyyy':
        resultDate = leadingZero(gotMonth) + '/' + leadingZero(gotDate) + '/' + gotYear;
        return resultDate + t;

        case 'dd/mm/yyyy':
        resultDate = leadingZero(gotDate) + '/' + leadingZero(gotMonth) + '/' + gotYear;
        return resultDate + t;

        case 'yyyy/mm/dd':
        resultDate = gotYear + '/' + leadingZero(gotMonth) + '/' + leadingZero(gotDate);
        return resultDate + t;

        default:
        resultDate = gotMonth + '/' + gotDate + '/' + gotYear;
        return resultDate + t;
    }
}
Now that we have created the functions to do all the heavy lifting for us, we need to call them.
Here’s a sample of getting a properly formatted string from a date:
var recMain = eWare.CreateQueryObj("SELECT * FROM Cases WHERE case_caseid = " + id +);
recMain.SelectSql();

Response.Write(getCRMDateString(new Date(recMain(createdDateField))))
Here’s a sample of converting a string into a date:
var myDate = parseCRMDateString(Request.Form("form_dateValue"));
Return to Top
How to Change Font Color, Size and Face in Sage CRM
Look out you rock ‘n’ rollers.
Sage CRM is one of the most flexible CRM applications on the market today. Looking to add a custom page, tab and/or panel to Sage CRM solution? Well I have some good news for you. The world is your oyster for coders and geeks alike.
But what if your coding skills are a bit rusty since your last BASIC (Beginner’s All-purpose Symbolic Instruction Code) seminar. Perhaps your aspirations are not so elevated.
Out of the box, Sage CRM does comes with a number of codeless features that enable the system administrator to, for example, add a custom fields to a screen. This seems easy enough.
Using the native tools inherent in the administration menu of Sage CRM, one can create a number of different types of fields. Textbox and Selection are definitely the most popular field types but many others exist as well.
Let’s take this one step farther. Nearly all of the fields that are presented in the user interface can only be modified by Changing the Font Size and/or Color. For example, perhaps your Sage CRM System is integrated with Sage X3 and you want to easily identify to the users, the fields that are seamlessly integrated between the application.
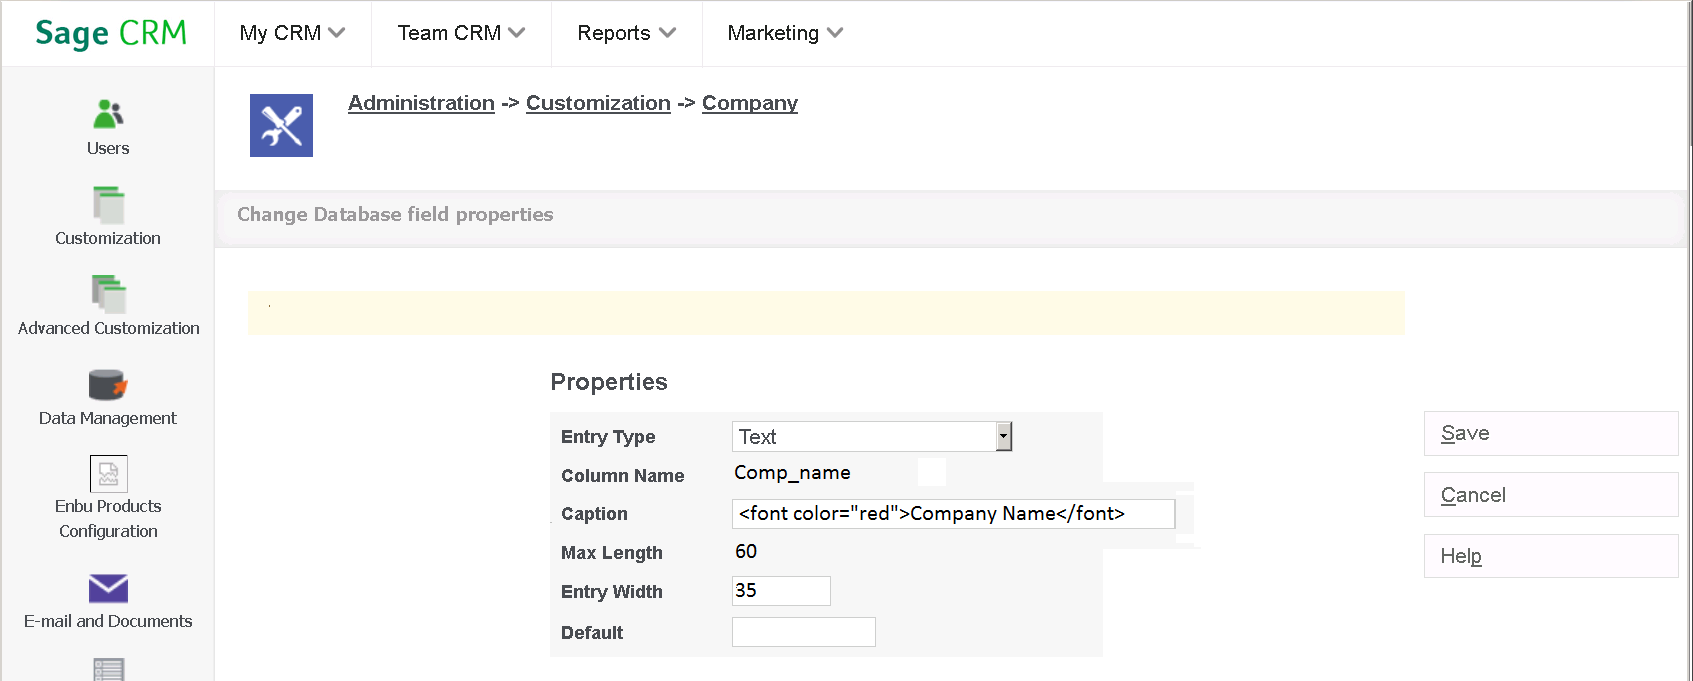
To accomplish this, modify the Caption of the field properties in Administration > Customization > Entity > Fields > Field Name, to include some simple HTML. For example, to make the “Company Name” field red, then change the Caption from Company Name to <font color=”red”>Company Name</font> (see illustrations below).

Other examples of manipulating the fonts in Sage CRM include:
- Font size: <font size=”3″ color=”red”>This is some text!</font>
- Font face: <font face=”georgia” color=”green”>This is some text!</font>
Try it out for size and/or color, your font face will appreciate it.
Return to Top
How to Create Parent-Child Relationships in Sage CRM
We see numerous clients that need to setup parent company-child company relationships. We’re going to show you how to create an easy parent/child relationship in CRM without using the out-of-the-box relationships tab—which many people find confusing (and frankly, it is).
This quick method shouldn’t take more than 5 minutes to setup and will allow you to find all child companies under a parent company, look up only parent companies across CRM or lookup only child companies across CRM.
1. Create two new fields on the company table by navigating to Administration > Customization > Company > New (button):
First field:
- Entry Type: Selection
- Column Name: comp_XXparent
- Caption: “Parent Company?”
- Lookup Type: “Use Existing Lookup”
- Lookup Family: “YesNo” (should be the last value in the dropdown list)
- Save this
Second field:
- Entry Type: Search Select Advanced
- Column Name: comp_xxparentcompany
- Caption: “Parent Company”
- Search Entity: Company
- Search SQL: comp_xxparent=’Y’
- Save this
2. Add these fields to the entry screen, search screen, and search results grid. Administration > Customization > Company > Screens (tab):
a. Click on the “Company Search Screen” hyperlink.
b. From the dropdown on the right, find the “Parent Company?” field in the company entity, select it, then click the Add button above the dropdown.
c. From the dropdown on the right, find the “Parent Company” field in the company entity, select it, then click the Add button above the dropdown.
d. Click the Save button on the right.
e. Select the “Company Entry Screen” and repeat steps 2a-2d.
f. On the Administration > Customization > Company > Lists(tab), select the “Company Grid” and repeat steps 2a-2d.
Now you have the fields where you want them. This will allow you to create relationships, search on and view the relationships. You just need to setup a few sample relationships so you can see how it all works.
3. Create a Parent Company
Go to the Main Menu and click Find > Company, then click the “Find” button off to the right. Drill into one of the companies you want to be the parent company by selecting the company name hyperlink.
4. Create Child Companies
Go to the Main Menu and click Find > Company, then click the “Find” button off to the right. Drill into one of the companies you want to be the child company by selecting the company name hyperlink.
b. Repeat 4a on another company.
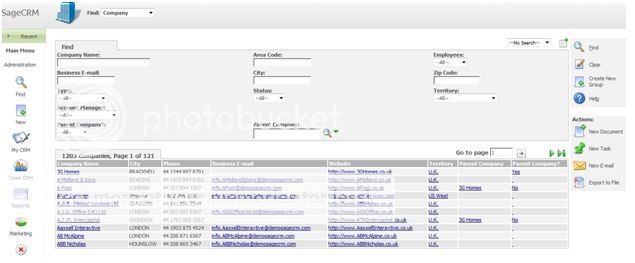
Now, when you go back to the Find > Company screen, you have several way you can lookup companies/company relationships.
- Use the “Parent Company” field to lookup any company that falls under that specific company as the parent.
- Use the “Parent Company?” “Yes/No” dropdown to find all companies that are not the parent company.
- Use the “Parent Company?” “Yes/No” dropdown to find all companies that are parent companies.
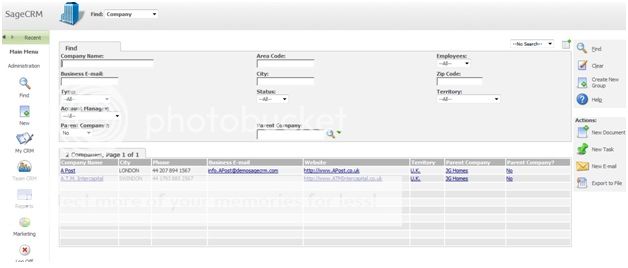
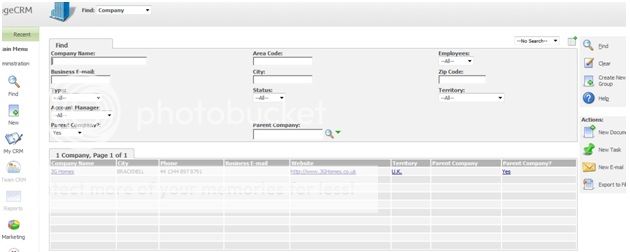
There you have it. Now, you can easily locate all child companies under a parent, or even just look for parent companies or child companies.
Return to Top
How to Create a Basic Sage CRM List Screen Using ASP
In this section, we will show you how to add a ‘Second Company’ field to the person table and use that field to create a simple ASP list screen on the company to show all the people linked to it as a second company.
You need to have access to the location Sage CRM is installed on your computer or server and be logged into Sage CRM as a system admin user.
First, you need to create the new field in the person entity.
You can do this by clicking on the Administration button in the top left. It’s found under the Main Menu button. Next click on Customization from the menu on the left and then the Person icon in the middle of the screen.
Make sure the Fields tab is selected and click on the New button on the right. In the first drop down list, called Entry Type, select the Search Select Advanced option. In the Column Name box type in pers_SecondCompany. Type in Second Company for the Caption field and set the Search Entity to Company.
In the view fields make sure the Company Name is selected. Now click Save.
Add this field to the Person Entry Screen so you can give it a value as needed. You can do this by clicking on the screens tab and then selecting the Person Entry Screen. On the right side under Field: select the new field you created, Second Company and then click on the add button right above the list. Click Save.
Now that your field is added and on the screen you can create the company list to show all people that have that company selected as its Second Company.
Create the new tab for the company that you will soon call your ASP page.
Go to Administration and click on Customization on the left menu. Now click on the Company icon in the middle of the screen. Click on the Tabs tab from the top and select the Company item in the list.
For the caption box type in Additional People for action select customfile. In Custom File type the name of your new ASP page. For this example you need to type Company/SecondCompanyList.ASP, because you are going to put the ASP file inside of a Company folder. Now click on Save.
Next, you need to create the ASP page and save it in the correct directory so Sage CRM can see the file. Open notepad to create your new ASP page. The first line of code to add is Sage’s code to look at the include file to help you build the page. You can do this by typing the following at the top of your file:
<!--#include file ="../eware.js" -->
Now open up the scripting area of the page and get the ID of the current company. You can do that with the following lines of code. You will use ‘<%’ to indicate that the code following is scripting code:
<%
var lId = eWare.GetContextInfo('Company','Comp_CompanyId');
Let the page know what list to display and set the search criteria for the list.
lstSecondPerson = eWare.GetBlock("PersonGrid");
lstSecondPerson.ArgObj = "pers_secondcompany = " + lId;
Add the list to a container block and make sure you hide the ‘Change’ button. This button will not work correctly on a list screen.
cntMain = eWare.GetBlock('container');
cntMain.AddBlock(lstSecondPerson);
cntMain.DisplayButton(Button_Default) = false;
Next add your container to the screen, execute the screen, set the tab list to Company and close out our scripting area.
eWare.AddContent(cntMain.Execute());
Response.Write(eWare.GetPage('Company'));
%>
Finally, save the file in the correct location. Click on save in Notepad and navigate to your install directory for Sage CRM. By default on a 64bit server it’s as follows:
C:Program Files (x86)SageCRM.
Drill down into your install name (ex. CRM), then WWWRoot and then Custom Pages. If you do not already have a Company folder here you need to create one. In the Company folder, save your ASP file as SecondCompanyList.ASP.
Head back into CRM and see your new list by going to a company and clicking on the Additional People tab. To add a person to that list, go to any person and populate the Second Company field with a company. Then go to that selected company’s Additional People tab to see the Person List.
Now that you know how to add a basic ASP page, you can play around with the code to see what else you can have your system do with your ASP pages. You may find more documentation on the types of things you can do in your ASP page by looking at your Sage CRM Developer Guide in the documentation folder included in your install files.
Return to Top
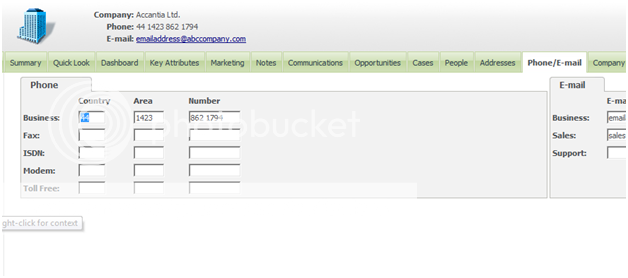
How to Add a Phone Number on the Sage CRM Phone / E-Mail Tab
Need to add an additional phone number line to the Phone/E-Mail Tab on a Company in Sage CRM? Here’s how.
You may have gone hunting around the Sage CRM administrative portion to find out where you can add an additional phone number to the out-of-the-box Phone/E-mail fields on the tab. This exercise will walk you through adding a phone number (Headquarters) line to the tab and also give you a basic understanding of the position of each phone number on the records.
First and foremost, you must be a system administrator and have access to the Administration portion of Sage CRM.
- Click on Administration | Customization | Translations and click New
- Caption Code = HQ
- Caption Family = Link_CompPhon
- Caption Family Type = Links
- Caption Order = 6
*The reason that the caption order is set to 6 is due to the fact that there are 5 numbers that currently exist on this tab and the caption order dictates which ‘slot’ or ‘position’ the new number will take. You may re-order the phone numbers using this very logic of changing the Caption Orders. For this example, we will place the new number at the end of the list.
- You may enter in both the US and UK Translation (and any others that are applicable) for your new Phone Number caption and click Save.

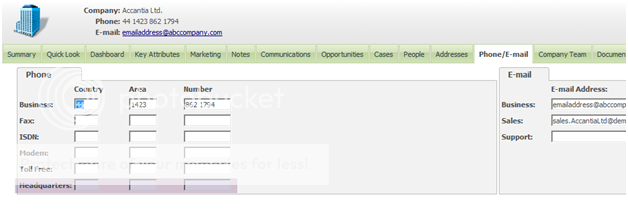
You have successfully added the additional Phone Number line to the Phone/Email tab on the company entity. A similar action must be taken to add a phone number to the Person entity. As you can see, with the proper tools and knowledge, Sage CRM is a flexible and easy to administer system.
Return to Top
Codeless Customization using Sage CRM
If you’ve used business software in the past, you’re familiar with customizations – usually code-based tweaks to your system to make it more efficient for your specific business needs. Customization typically takes in-depth programming skills that only developers had – but Sage CRM allows you to make some advanced tweaks WITHOUT using code.
Customization 101 in Sage CRM
The latest versions of Sage CRM was redesigned from the ground up to meet the needs of modern users who connect to their CRM data directly from their smartphone, tablet, or computer; or who use their CRM data indirectly through integrated apps.
The way that Sage CRM connects with various devices and programs is through open programming, which enables integration with a wide range of developer tools, including Runblock.
What is Runblock?
Runblock empowers your CRM system administrator (most likely if you are reading this, it’s you) to modify displays and menus in your CRM for all your users.
Runblock helps you:
- Interlink internal CRM data in new ways
- Connect CRM with an external database
- Choose where and how to display information in your CRM
Perhaps you want to access your company’s current quotes but you don’t want to spend time clicking into individual system records. You can display your quote information at a glance by interlinking the quote information to the company information (all in CRM), which would provide you with an overall view of all your open quotes on a single, easy-to-reach screen.
If you want to find and show data in Sage CRM 2017 from an external database such as Sage 100, Runblock will help you connect your CRM system to your ERP, as long as you know which server your ERP data is on and you have the login credentials to access your ERP as a system administrator.
Once you’ve interlinked your internal CRM information in new, interesting ways, and/or drawn in helpful data from an external database such as your ERP, you can use Runblock to quickly display your new, at-a-glance data directly from a custom menu option you create.
Using the Customization Interface
Want to see Runblock customization in action? Check out this training video from Sage.
Not quite up to the task of codeless customization? We can help you achieve your ideal system setup.
Your Metadata Matters
The most important thing you need to know about the current version of Sage CRM is that it’s built on a framework of metadata, which forms the essential skeleton of your data, including things like field captions (First Name, Email Address, Company Name) or field behaviors (Text field, Dropdown field, etc.)
If you format your metadata properly during your initial CRM setup, you’ll have the freedom and flexibility to confidently navigate and modify the back end of your system, making your system your own – even if you don’t have coding skills.
Return to Top
Create a Calculated Field and Show a Proper Caption
When creating a view you may need to create a field that is derived or calculated from other fields in the database. Because this field isn’t an actual Sage CRM field, it will not come with a proper caption and will show up looking strange when it’s used on screens or reports.
In this section, we will teach you how to create the calculated field and give it a dummy field name that Sage CRM translates into the caption you would like your users to see. We will use the view ‘vReportCompany’ in this example.
The first step is to modify your report view to include your calculated field. Go to Administration, Customization, select the company entity, click on the views tab and select the view ‘vReportCompany’. Next, edit the view by clicking on the Change button. Directly after the keyword ‘SELECT’ in the query, add in the following SQL code:
[sourcecode language="csharp"]
IsNull(rtrim(comp_name),'') + ' - ' + IsNull(rtrim(Comp_Status), '') as Comp_NameAndStatus,
[/sourcecode]
This code will put the company name and status together with a hyphen in-between.
You need to include the IsNull() around each field because trying to combine strings will not work the way you desire if any of the values returns a null. So IsNull(fieldname,”) will return a blank and not a null when the value is null.
And you also need to use rtrim() to take any extra space stored at the end of a field. Once you have added the code, click Save. Sage CRM will check to make sure the view has no SQL errors before saving.
You will also notice that we added a name to the calculated value as though it were a real field in Sage CRM ‘Comp_NameAndStatus’.
When running a report that uses this field, Sage CRM will look through its metadata tables to find a translation that matches. Always use a field name that isn’t already in Sage CRM as this can cause SQL errors or confuse the users on which data they are seeing in reports. To make sure the reports are created correctly, you will need to create a report that uses this field.
Go to Main Menu, Reports, select the ‘General’ report category and click on New. Name the report ‘Company and Status field Report’.
From the source view select ‘Company Summary’. In the drop down list of fields on the left, select the field you added, ‘Comp_NameAndStatus’ and click ‘Add To Report Contents’. Now that you added the field, click on Continue and Save.
As you saw when creating the report, the field was displayed in the list as ‘Company: Comp_NameAndStatus’.

It would also show up as ‘Comp_NameAndStatus’ if you ran the report, so now you need to make sure Sage CRM can translate ‘Comp_NameAndStatus’ into a real caption of your choosing.
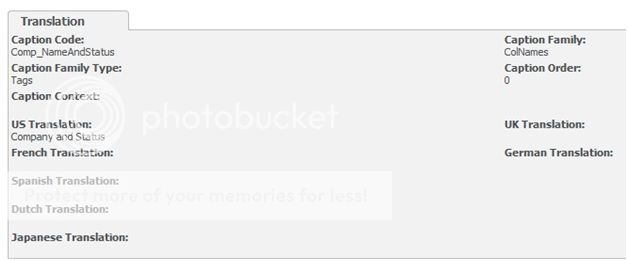
To do this, go to Administration, Customization, click on Translation and click New.
In the Caption Code, block type in your field name ‘Comp_NameAndStatus’. For Caption Family, type in ‘ColNames’. In the Caption Family Type box, type in ‘Tags’ and in the US Translation area type in the caption you wish to use. For this example, type ‘Company and Status’ and click Save. Your summary screen should look like the example below:
If you see anything that is incorrect, click on Change, correct the field and click save again.
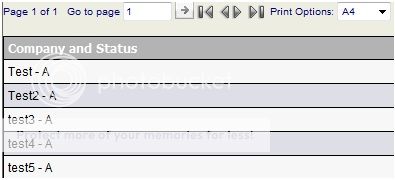
Now that you have added the translation, go back to the test report you created earlier. You can do this by going back to Main Menu, Reports, General and selecting the report you created: ‘Company and Status field Report’. You will now notice that when you run the reports it has the new caption you created and not the dummy field name from the view.
Now you are able to create as many calculated or derived fields as you need for your user’s reports. You can also give them adjustable captions.
Remember, be cautious and always backup before modifying views – particularly ones that you didn’t create, even minor changes to them can cause problems in areas of CRM you may be unaware uses the modified view.