Table of Contents
How to Choose Between Sage CRM Outlook and Exchange Integration
How to Install the Sage CRM and Outlook Plugin
How to Use the Sage CRM and Outlook Plugin
How to Integrate Sage CRM and Outlook Without The Plugin
How to Solve Common Sage CRM and Microsoft Outlook Integration Issues
How to Setup Sage CRM and Microsoft Exchange Integration
How to Choose Between Sage CRM Outlook Integration and Exchange Integration
We frequently receive questions from clients about the differences between the Outlook Integration with Sage CRM and the Exchange Integration. The two methods of synching data between Outlook and CRM transfer the same data, but they are accomplished two different ways.
Here’s an in-depth look at both.
Sage CRM and Outlook Integration – Synching Handled By the Plugin
The Sage CRM Outlook Integration was the first of the two methods of integration. It was released years before Sage implemented the Exchange Integration.
This works by installing a plugin on your desktop Outlook client. The Sage CRM Outlook plugin handles 5 different features, 4 of which are managed by settings in the CRM user configuration (in CRM, go to Administration > Users > User Configuration).
The 5 features are the following:
- Sync Outlook Tasks
- Sync Outlook Appointments
- Sync Outlook Contacts
- Sync Outlook Deletions
- File E-mails into CRM from Outlook
Filing e-mails into CRM from Outlook is a manual process. Users must manually select which e-mail from Outlook they want to file into CRM.
Many customers ask for emails to automatically file but the manual process is a good thing as it prevents thousands of unwanted Outlook e-mails filed automatically into CRM (i.e., newsletters, personal e-mails, spam, etc.).
If the user is using the classic Sage CRM Outlook Integration, they must have Outlook open in order for the synching to take place. Another consideration is that the plugin is now only installed on 32-bit machines.
And it’s important to note that there are many pieces at play with the Outlook plugin which creates many points of failure when compared to the Exchange Integration.
Sage CRM and Exchange Integration – Synching Handled By the Server
As opposed to the classic Outlook Integration, the Sage CRM Exchange Integration synchs directly from the server level, eliminating the requirement that the user must have Outlook open on their local computer for the synch to take place.
Based on a setting inside of the administration area of CRM (Administration > E-mail and Documents > Exchange Server Integration (after Exchange Integration has been turned on in Administration > System > System Behavior), you can change the sync interval to a specific number of minutes. This will restart the synching mechanism for all Sage CRM users / Exchange mailboxes that have synching enabled within Sage CRM.
Some advantages of using the Exchange Integration include having the auto-synch of tasks, appointments, contacts, and deletions. If your computer is turned off, the integration will still synch up with Outlook calendar.
Another advantage is that while installing a plugin on the user’s computer is still required, you a) only need to do this on user’s computers who want to file e-mails in addition to having the tasks, appointments, contacts, and deletions synch, and b) the plugin that gets installed for the Sage CRM Exchange Integration is much smaller because it does not include the calendar synch. This makes it easier to manage and it creates less points of failure.
In summary:
- Users can have the Exchange Integration on and synch calendars without having to install the plugin—unless that user wants to file e-mails into CRM.
- Other users, who don’t want the sync turned on, do not have to have anything installed (this is true of the Classic Integration as well).
Return to Top
How to Install the Outlook Plug-In for Sage CRM
Get the most from Sage CRM by installing the Sage CRM Outlook Plug-In.
Once your Sage CRM install and configuration is complete, it’s time to deploy the Outlook Plug-In to all of the workstations. You need to install this on every machine in which the CRM user wants to use the Outlook integration with Sage CRM. And note that you will need to install any subsequent updates and patches on those same machines.
Make sure to check the Sage CRM compatibility guide to verify your version of Outlook is compatible with the Sage CRM install version.
NOTE: Outlook Web is not supported by the plug-in.
Before you start, be sure to log onto the local machine as an administrator.
NOTE: It’s important to have all the necessary rights in Windows to complete the installation properly.
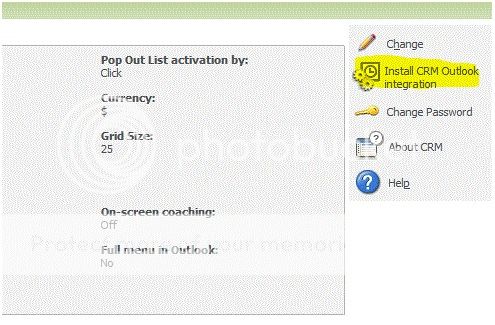
- Log on to Sage CRM via the CRM URL (within Internet Explorer) that you were issued by the CRM administrator. Go to My CRM | Preferences | Install CRM Outlook integration
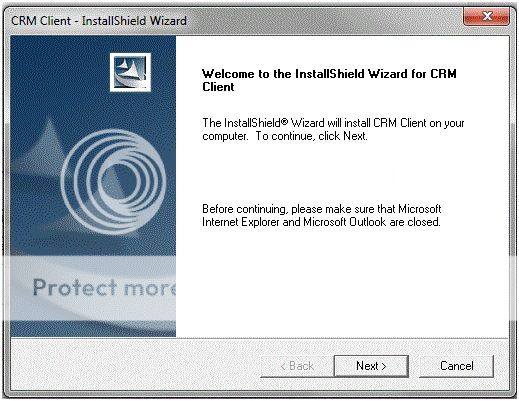
- Run the CRMClientSetup.exe file. Make sure your pop-up blocker is turned off in Internet Explorer. Once the Installer launches, you will be prompted to close Internet Explorer and Outlook. Keep the installer open and close these windows. Then click Next and go through the wizard confirming your install information and answering prompts affirmatively.
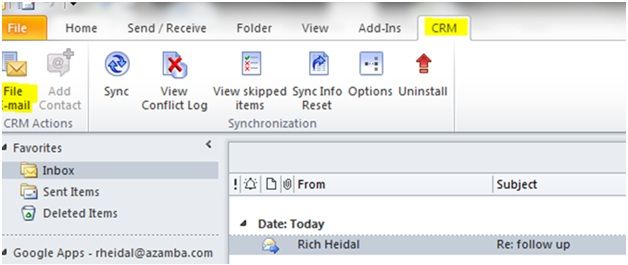
- Once the wizard is complete the Sage CRM Outlook integration is installed. To verify, launch Microsoft Outlook and you will notice a CRM tab or toolbar (depending on which version of Outlook you are running).

Now that you’ve installed the Sage CRM Outlook integration you can start filing your incoming and outgoing emails from Outlook by highlighting the message and clicking File E-Mail.
You can also add contacts to CRM directly from your address book.
Sage CRM is all about keeping a high visibility at your organization. Since we all depend on Outlook so much, it’s a valuable tool to be able to place the emails that we file and hold dearly in Outlook in CRM.
This feature makes it easy for the entire organization to share and to keep all customer/vendor/partner information organized and centralized.
Return to Top
How to Use the Sage CRM and Microsoft Outlook Integration
Sage CRM integration with Microsoft Outlook gives you complete two-way synchronization with email, contacts, appointments and tasks. You can work directly in Microsoft Outlook or Sage CRM to get your messages through.
In Microsoft Outlook, you can send and receive email and select which records to save against in CRM. The flexibility to select which emails are pushed over will ensure the relevant data is stored where you want it and your personal information, i.e. an email from your doctor, isn’t stored in your organization’s Sage CRM database.
After you have connected Sage CRM and Microsoft Outlook, you will notice an additional tab labeled “CRM”. To attach an email to CRM, you simply select the CRM tab, highlight the email and hit the “File E-mail” button.
In the pop up you can now select the appropriate records to save against in Sage CRM. Here, you select the company and person (contact) records then hit the “File E-mail” button.
Note: you can also attach to an appropriate Opportunity record using the file type “About”.

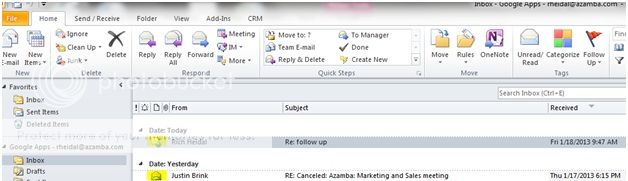
Once you have successfully attached your email to CRM, you will notice a new icon has appeared. This is gives you at-a-glance confirmation the appropriate email is saved in CRM. In the image below you can see the top email has a closed envelope with a globe icon, confirmation the email is attached in Sage CRM. Below that email is another, not attached in CRM, showing an original open envelope icon.
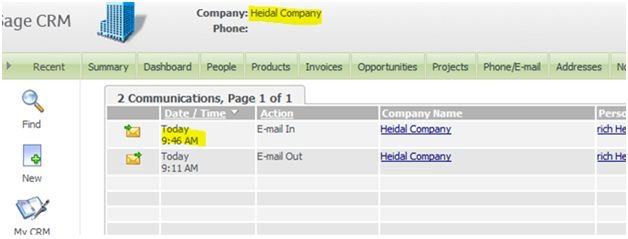
In Sage CRM, you can go directly to the Company record and pull up the Communications. Below you will notice the email you attached using Microsoft Outlook filed under the proper record.
Using Sage CRM, you have full email functionally: anyone can view this email if you provide them access. This is useful, for an example, if management or team members need to access an email attached to a deal or sale. Anyone with Sage CRM access can go to the record and find the email. Again, this can be locked down too, only allowing access when needed.
Sage CRM gives you full access to the saved email. You pull up saved emails and can directly respond to the email instead of creating a new, separate email chain in Outlook like other CRMs force you to.
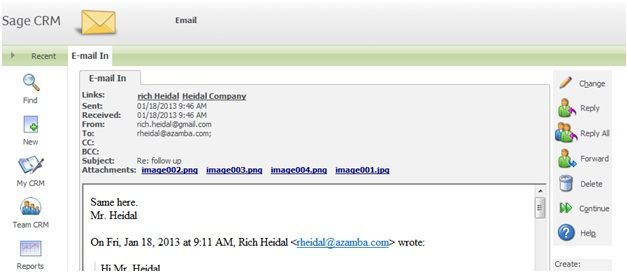
Having Sage CRM and Microsoft Outlook fully integrated out-of- the-box will save you time. Your team will have real-time integration giving you fully functional email, including filling of attachments, within Sage CRM. You have actual email archiving, not snap shots of email messages like Microsoft Dynamics. Anyone you give access to will be able to pull up previously saved emails and follow up accordingly.
This is an invaluable tool to see where things stand related to specific records. No more moving back and forth between Microsoft Outlook and CRM to get your work done. Simply go to the account and pull up communications and all attached emails will be present for quick review and reply options.
The integration will enhance communication tracking and increase productivity among users. Sage CRM and Microsoft Outlook integration is powerful and easy to use.
Return to Top
How to Integrate Sage CRM and Outlook Without The Plugin
In an earlier section, we reviewed the differences between the classic Sage CRM Outlook Integration and Exchange Integration.
But some environments require integration without using either the Outlook plugin or Exchange integration:
- Some or all of the users are using Macs. The CRM Outlook Integration is only compatible with Windows machines.
- The IT department does not want any plugins installed on users’ Outlook clients. This is completely understandable given security levels required by organizations in today’s world (although I have never heard of the Outlook Plugin being a security risk).
- Some users have multiple computers and devices. Employees of some companies have a desktop, a laptop for the road, a tablet, and a phone. While the Outlook Plugin can only be installed on a desktop Outlook client, this poses an even greater problem—what happens when you have the Outlook Plugin on your desktop, but then go on the road with a tablet? How do you file e-mails?
There are two pieces of Sage CRM functionality that can be used to get around having to install a plugin on each computer and still get full integration. Here’s what needs to be done:
- Turn on and configure Exchange Synchronization. This will synch your appointments, tasks, contacts, and deletions with Outlook. This is considered the “calendar synch.”
- Turn on and configure Advanced E-mail Manager (AEM). This will file e-mails forwarded from you into CRM. For example, let’s say you received an e-mail from John Doe and want to have it filed under his account record in CRM (your IT department will have to create a reserved mailbox for CRM to monitor—i.e., crm@yourcompany.com). CRM will create a communication record or create a new case record depending on your configuration settings in the administration area for AEM.
Once these two features, Exchange Synchronization and Advanced E-mail Manager, are configured, you no need to install the Outlook Plugin on any machines.
This approach bypasses the Mac compatibility issue, your IT department’s policies, and the multiple-device problem. More upfront work is required to get these two features setup, but they are easier to troubleshoot over the long haul and don’t require reinstallation of anything if any of your users get a new computer or device.
And the Advanced E-mail Manager even can be customized to file e-mails into already-created opportunities, cases, or even quotes or orders. You can script out rules to monitor and file emails based on your specific requirements.
You can even make the filing of the e-mail conditional. For example, if you wanted some general correspondence to be filed under a Person record in CRM, you could just forward the e-mail as is. However, if you wanted an e-mail from that same customer to be filed under a quote, you can customize the Advanced Email Manager so that you can put the quote number into the subject line and the email will be automatically filed under that specific quote by simply forwarding the e-mail to the monitored email inbox. And it files any attachments on the e-mail, too!
Return to Top
How to Solve Common Sage CRM and Microsoft Outlook Integration Issues
Simple Solutions to Common Sage CRM and Microsoft Outlook Integration Issues
When you are dealing with Sage CRM and Outlook integration there are a few common problems you may run across during and after installation. This article will cover the top 4 issues our customers encounter.
Before you read any further, check to make sure your version of Outlook is compatible with your current version of Sage CRM.
- Insufficient User Permission
- Non-Functional CRM Buttons in Outlook
- Add-Ons and Anti-Virus
- Go to your COM Add-ins again, find and deselect the problem add-in. If this doesn’t resolve the issue, you need to run a repair on Outlook.
- To repair Outlook, first close the program. Go to Start and click on Control Panel. Click on Add/Remove Programs (Windows XP) or Programs and Features (Windows 7). Now select Microsoft Outlook 2010 and click on Change. Next, select Repair and then Continue. This may take awhile to run and you need to reboot your computer once it’s complete.
- Improper Installation
The first problem you may come across is an inability to install the integration at all. You may receive errors on upon installing that let you know you are unable to edit the registry, or once done installing, you notice that there are no CRM buttons in Outlook.
The likely cause of this is insufficient permissions for the current user on that machine. The installation requires creating files that will modify Outlook and create registry entries. If the user doesn’t have local admin privileges, Outlook may not install correctly or at all.
Note that logging out as that user and installing the Outlook integration as a different user in an attempt to bypass this will also cause the integration to not work correctly.
A second very common problem is CRM buttons are showing up in Outlook, but they don’t function properly. You may notice this directly after the install, or even after the user has been successfully using the integration for some time.
This might be caused by Outlook disabling the integration add-on. To re-enable the add-on in Outlook 2010 go to File Options. In the Outlook Options screen, click the Add-Ins option on the lower left side.
In the Manage drop down box, select COM Add-ins and click on Go. Once you find your Sage CRM add-in in the list, make sure it’s selected and click on OK. Close and restart Outlook, then verify the CRM buttons are now working correctly.
Another major issue is an add-on or antivirus in Outlook messing with your integration. If this is the case you can solve the problem is one of two ways:
A less common solution to some or all of the buttons not working correctly in Outlook after the installation is to run the plugin .vsto file manually as an administrator. In some cases, this file will not install correctly so you must manually do it.
To do this go to C:Program Files\SageCRM\Client\Outlook Plugin, right click on the file “SageCrmOutlookAddIn2010.vsto” and click Run as Administrator. You will need to make sure Outlook is closed during this installation. Once it’s complete, open Outlook and check that your buttons are all working.
Remember to always check your version of Outlook is compatible with Sage CRM before upgrading either system. Also note that you will need to upgrade each users Outlook add-in each time you patch upgrade Sage CRM.
Return to Top
How to Setup Sage CRM and Microsoft Exchange Integration
Learn how to set up Sage CRM Integration with Office 365’s Exchange Online to streamline your process and make life easier for your CRM users.
Configuring Sage CRM Integration with Microsoft Exchange 365 is a straight-forward process.
Enable Exchange integration in Sage CRM
- Go to Administration-> System -> System Behavior
- Change Use Exchange Server Integration: to YES
Next we need to set up Application Impersonation for the user we will be using for exchange integration. To set this up:
- Log into your Office 365 portal
- Launch the Exchange Admin Center
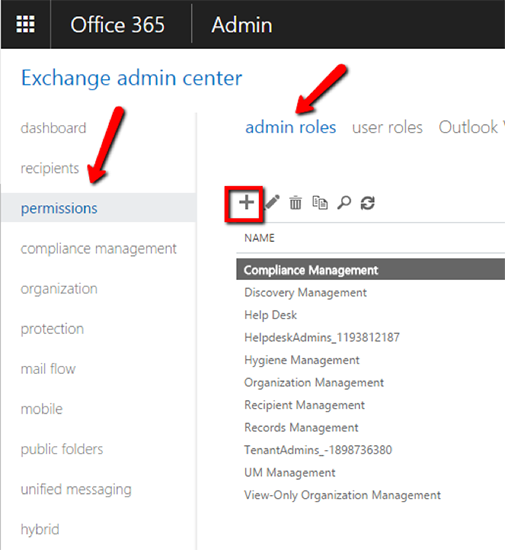
- Browse to Permissions > Admin roles.
Click the “+” sign to add a new role.
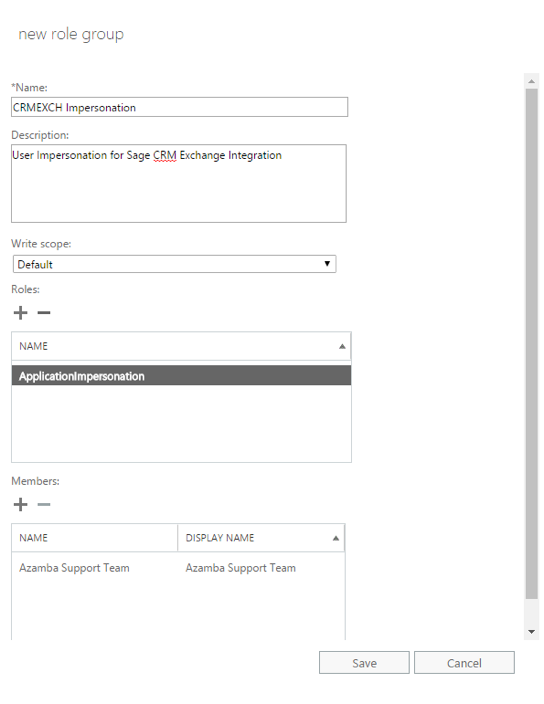
- In the role group dialog box Provide a name for your Role Group (i.e., “SageCRM Exchange Integration”).
- Under Role click the “+” icon to add a Role.
- Select “Application Impersonation”, click “Add” and then click OK.
- Under Members click the “+” icon to add a new member to the RoleGroup. This user will need to have a working mailbox, as well.
- Click Save.
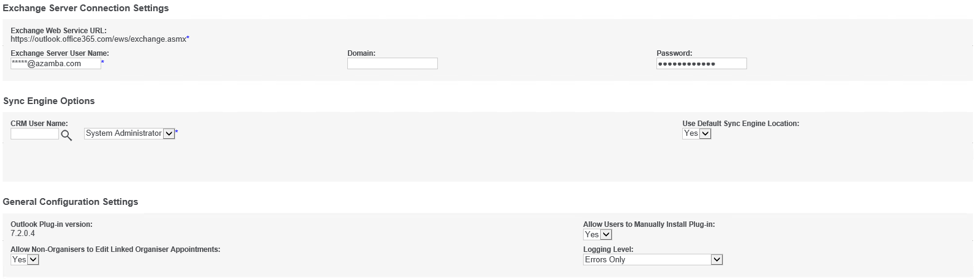
Configure the Sage CRM Exchange Synchronization Settings
- Login to Sage CRM and browse to: Administration -> E-mail and Documents -> Exchange Server Integration -> Connection Management
- Click New
- Enter the information required as below:
Exchange Web Services URL: https://outlook.office365.com/ews/exchange.asmx
Exchange Server Username: [Impersonated User]
Domain:
Password: [Impersonated User Password]

- Click Save
Exchange Web Services URL: https://outlook.office365.com/ews/exchange.asmx
Exchange Server Username: [Impersonated User]
Domain:
Password: [Impersonated User Password]
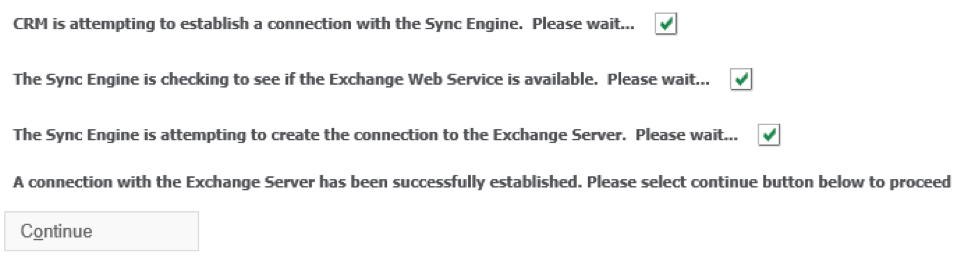
The integration will now setup the connection
Next we need to enable the users for integration. Click the User Mailbox Management tab.
- Click Change
- Check the Synchronize checkbox for the users that will have exchange integration enabled for them
- Click Save
We have completed the setup of the integration, and the only thing left now is to turn it on.
Browse to Administration -> E-mail and Documents -> Exchange Server Integration -> Synchronization Management and click the Enable button.
The sync will start now and should take a few minutes for the initial sync.
At this point, your Sage CRM and Office 365’s Exchange Online will be complete.