Table of Contents
Sage CRM Importing and Exporting Overview
How to Import from a Spreadsheet into a Sage CRM Custom Entity
How to Export Contacts and Email Addresses from Sage CRM
One Trick How To Find and Clean Sage CRM Duplicate Data
How to Configure Sage CRM Match Rules
How to Merge Companies in Sage CRM
Keep Your Sage CRM Database Running Efficiently with SQL Maintenance
What to Do After a Sage CRM Database Move
Sage CRM Importing and Exporting Data Overview
The following list is a set of general tips and guidance about how importing and exporting works within Sage CRM:
- By default, all system users are able to export data from Sage CRM, and many times users will do this right from a Search screen. However, Sage CRM enables exports from multiple parts of the system.
- Data can be exported as .csv or .xls format. You can also dump data out in PDF format if you run a report. This can be useful if you are sending the data to someone for inquiry purposes only.
- From Search Screens, select the values that you want to use as filters for your data and then click Find at the right-hand side of the screen. The body of the page will fill with columns specified by your menu selections. The same columns that will appear in the export file.
- If users have permission, they can also opt to save searches to create an easily accessible history so current data may be compared to other snapshots in time.
- The Sage CRM Search Screen exports have a limit. If you need more data, you should use the Reports section. Either take advantage of the numerous out-of-the-box reports or create a custom report.
- You can customize your exports by modifying an existing report or building a new report. This will give you complete control to add the columns and records you want via the Sage CRM Report Builder.
- By design, only administrators can import content—in any of a number of file formats–to Sage CRM. Import rights may be granted to individual users by the administrator. You can use these security rights to restrict or grant imports and exports.
- Data imports fall into one of three categories in Sage CRM: companies, individuals—that is contacts nor related to a company, and leads. The third option is helpful in keeping unqualified leads, such as tradeshow lists or purchased data, out of your main sales pipeline.
- When you select one of the three data types to import, Sage CRM will show past uploads in that category. This gives you the opportunity to use an existing merge template (Select From Existing Mappings) instead of creating a new data file.
This was a very brief overview of how importing and exporting works and hopefully will get you off to a good start. Remember to always backup your database before importing data.
Return to Top
How to Import from a Spreadsheet into a Sage CRM Custom Entity
Importing directly into a custom entity can be tricky as Sage CRM doesn’t offer an out-of-the-box solution. We’ll cover one way around this problem.
Getting Started
First we will cover how to get your data into a temp table in SQL. Then we’ll cover how to move your data from the temp table into your custom entity in Sage CRM.
This article assumes you have a good understanding of SQL Server and SQL Query language. Remember to always back up your Sage CRM database before working directly in SQL.
Prepare Your Spreadsheet
Before you begin the import, clean up your spreadsheet.
You need to add two extra columns to the spreadsheet. Add an Import ID column and an Import Name column. These two fields will also need to be added to your custom entity in Sage CRM.
This will create a link back to the import spreadsheet to verify or troubleshoot any issues with the imported data.
Once you have the Import Id column in your spreadsheet, you need to populate it with a unique number for each row. Generally, it’s easiest to number the columns starting with 1 and count up to the end of the spreadsheet works.
You also need to fill in the Import Name column with the same name for each row. If you are using a CSV file, make sure you are escaping cells with commas and quotes in your CSV file with double quotes.
Bring Data in to a Temp Table
Now that your spreadsheet has been cleaned up and is ready for import, we can import the data into a temp table in SQL.
To do this, go into your Microsoft SQL Server Management Studios and connect to your SQL database server. Once you are connected, expand ‘Databases’ then right click on your CRM database, scroll over ‘Task’ then select ‘Import Data…’. Under ‘Data source’, select your data type. This should either be ‘Microsoft Excel’ for an Excel file or ‘Flat File Source’ for CSV.
Browse to your file path. If you are using a CSV file, set your text qualifier to a double quote and check the box for ‘Column names in the first data row’. Click on the ‘Advanced’ option on the left side of the screen. Make sure each column is set big enough to contain the data you are importing, select ‘Next’.
The next screen contains the information for you to connect to SQL server. This information should already be correct but adjust anything that is needed so your data can be imported then select ‘Next’.
This screen is showing you the temp table that the spreadsheet will upload to. Click on the destination name and change the name from your excel file to the name of your CRM table with ‘_Import’ on the end. For example, if you are importing into the Sage CRM table called ‘Widgets’, your temp table name should be called ‘Widgets_Import’. Now select ‘Next’. Here you can choose to save this import to run later or run now. If you are ready to run the import, make sure the ‘Run Immediately’ check box is selected then click ‘Finish’.
You can watch the progress of your import. Once the import is complete, you can run a query to make sure all of your records are in your temp table and that the imported data is correct.
Now that your data is in SQL, you can easily make any updates or changes you need to on your temp table to confirm it’s ready to be imported to Sage CRM.
Move the Data to Your Custom Entity
At this point, your data should be in the temp table and we assume your custom entities, screens, and list have already been setup, so you can see and verify the data inside Sage CRM after the transfer is complete.
Now that your data is ready to be moved into your Custom Entity table, you need to build your SQL Insert statement which will be used to move the data from the temp table to your actual table. An example of the syntax for inserting the data is as follows:
[sourcecode language='jscript']
INSERT INTO Widgets (widg_widetId, widg_Name)
VALUES
SELECT id, name
FROM Widgets_Import
[/sourcecode]
In this statement, Widgets is your Sage CRM Custom entity table and Widgets_Import is your temp table with your data to import. Remember, your Sage CRM ID field needs to be unique. If you do not have a unique record Id in your data, you can use the “import Id” you added in the earlier section.
You must make sure your list of fields in the parentheses has the same number of items as your select statement and in matching order and insert the ImportId and ImportName fields you created in your data. Adding these fields will allow for easy record matching if you made any errors or if you need to run any updates after your initial import. This can be very helpful if your data must to be linked to an existing entity in Sage CRM.
You need to add a few additional Sage CRM fields to your insert. Three date fields you need to import are:
- widg_CreatedDate
- widg_UpdatedDate
- widg_Timestamp
Each of these can be set to GetDate() if you do have not have these dates in your import data.
You also need to set the two Sage CRM user fields:
- widg_CreatedBy
- widg_Updatedby
Each of these must to be set to a user id from Sage CRM. You can use ‘1’ to set it to the default Admin account. Here is a full example that imported your ID, a name field, the imported/name fields and the Sage CRM date and user fields.
[sourcecode language='jscript']
INSERT INTO Widgets (widg_widetId, widg_Name, widg_CreatedDate, widg_UpdatedDate, widg_TimeStamp, widg_CreatedBy, Widg_CreatedDate, widg_ImportId, widg_ImportName)
VALUES
SELECT id, name, datecreated,  GetDate(), GetDate(), '1', '1', ImportId, ImportName
FROM Widgets_Import
[/sourcecode]
The next step is matching a data column to and existing entity in Sage CRM. For example, you may have a CompanyName row in your import data. You do not want to import this directly into the widg_Companyid column because this field only allows integers and it will not correctly link back to the company.
Here is an update you can run after your import to set the correct company ids. You must make sure that your company names match exactly or some records will not be updated.
[sourcecode language='jscript']
UPDATE Widgets
SET widg_CompanyId = Comp_Companyid
FROM Widgets
INNER JOIN Widgets_Import ON Widgets_Import .ImportId = widgets.widg_importid
INNER JOIN Company ON Company. Comp_Name = Widgets_Import .CompanyName
WHERE IsNull(Widgets_Import .CompanyName, '') <> ''
[/sourcecode]
This will use your ImportId to link the imported data with the temp table matching data and link to the company based on the name. In the WHERE clause, make sure to skip anything that has a blank or NULL CompanyName. Now that all your data is in Sage and you have verified that it’s correct, there is one last query to run. This query will make sure you do not run into errors trying to create new widgets records in Sage CRM and correctly set your Next Id value for the correct table in SQL.
[sourcecode language='jscript']
UPDATE SQL_Identity
SET Id_nextId = (SELECT MAX(widg_widgetId) + 1 FROM Widgets)
FROM SQL_Identity
INNER JOIN Custom_tables ON Id_tableId = bord_Tableid
WHERE bord_Caption = 'Widgets'
[/sourcecode]
Now that your data has been properly added to Sage CRM, you can create reports, run finds and add/edit/delete data as needed in Sage CRM. Again, please remember to always backup your CRM database before you do work directly in SQL.
Return to Top
How to Export Contacts and Email Addresses from Sage CRM
The Sage CRM system is a central database of contact information and data, but at times you may need to upload that information into some other system, such as a third-party marketing campaign application, or to manage information manually in spreadsheet format.
The default method for accomplishing this is to export lists of contacts to Microsoft Excel in whatever format you need, including XLSX, CSV, TXT, or other formats. Once those lists are in Excel, users can then open the files, save to the desired locations, determine the formats to use, and make any edits needed.
There are multiple ways to export contact lists from Sage CRM to Excel, including:
- Exporting the regular Sage CRM Person/Contact search results to Excel
- Creating a Person/Contact Group and exporting it to Excel
- Creating a standard Sage CRM report and exporting it to Excel
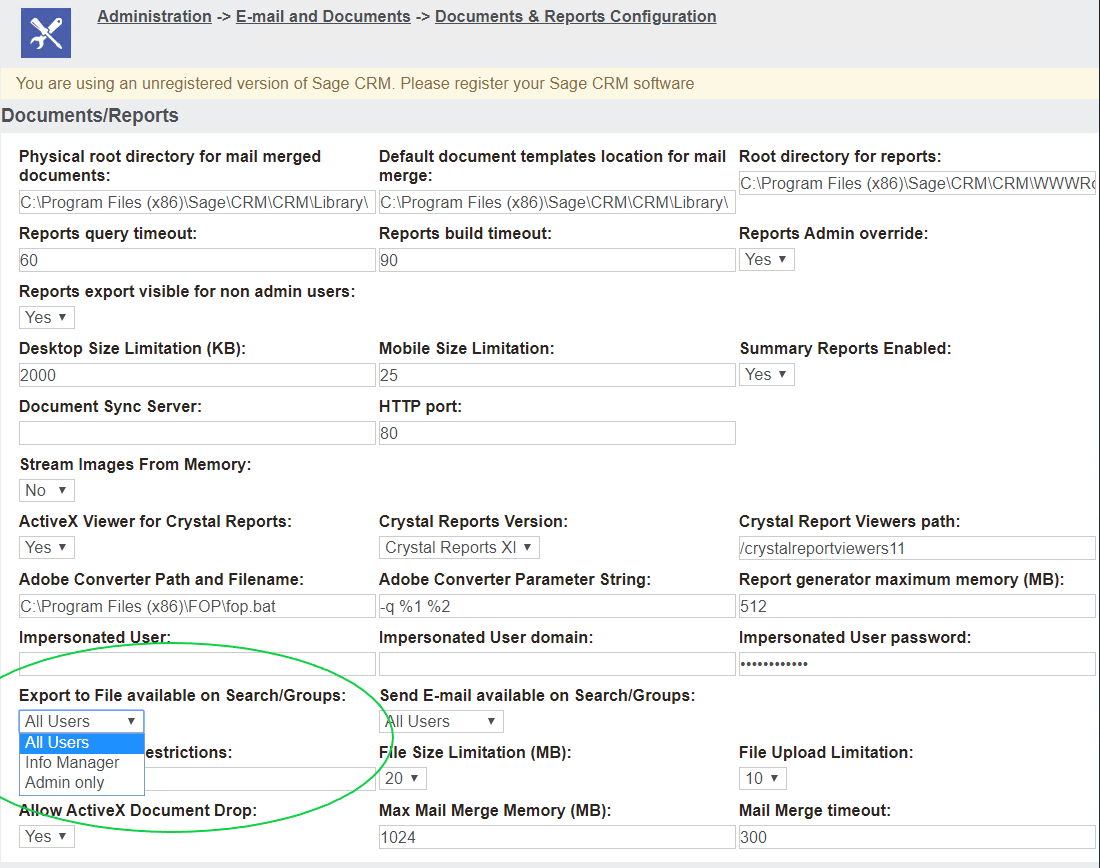
In order to export groups and searches to Excel, you will need to navigate to Administration > E-mail and Documents > Documents & Reports Configuration and assign the ability to “Export to File in Search/Groups” to All Users, Info Managers, or Admin only, as shown below:
You can give access to Groups and Reports to individual Sage CRM users in Administration > Users > User Setup.
Then, you can choose one of the methods below to export your contact lists and email addresses from Sage CRM to Microsoft Excel:
Export contacts and email addresses using a search list
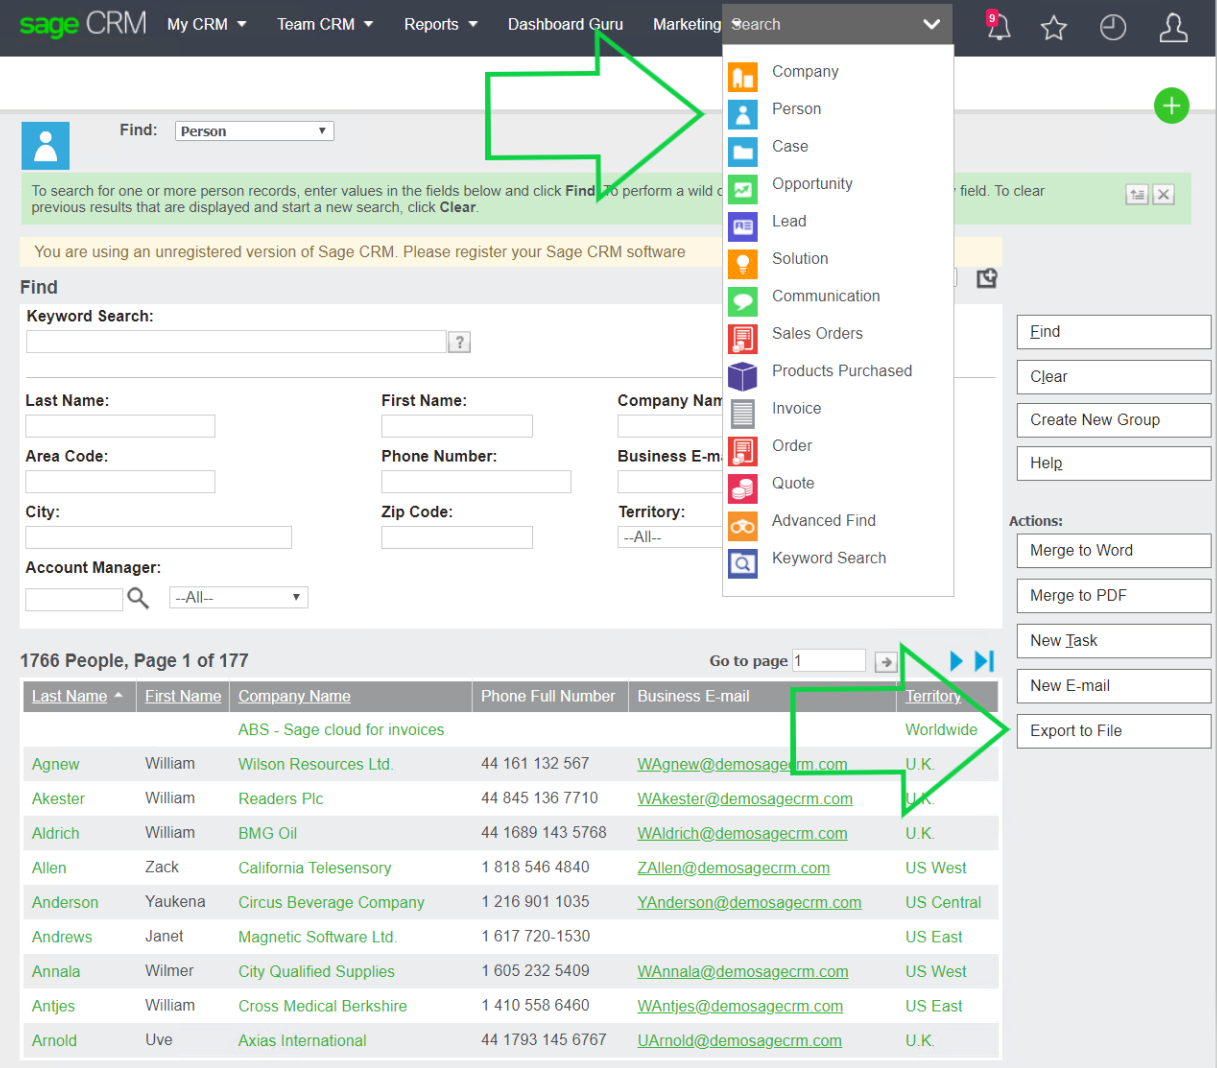
1. Navigate to the Search > Person option.
2. Generate a list of persons that displays their business email addresses.
3. Click Export to File:
Export contacts and email addresses using Sage CRM groups
1. Navigate to My CRM > Groups:
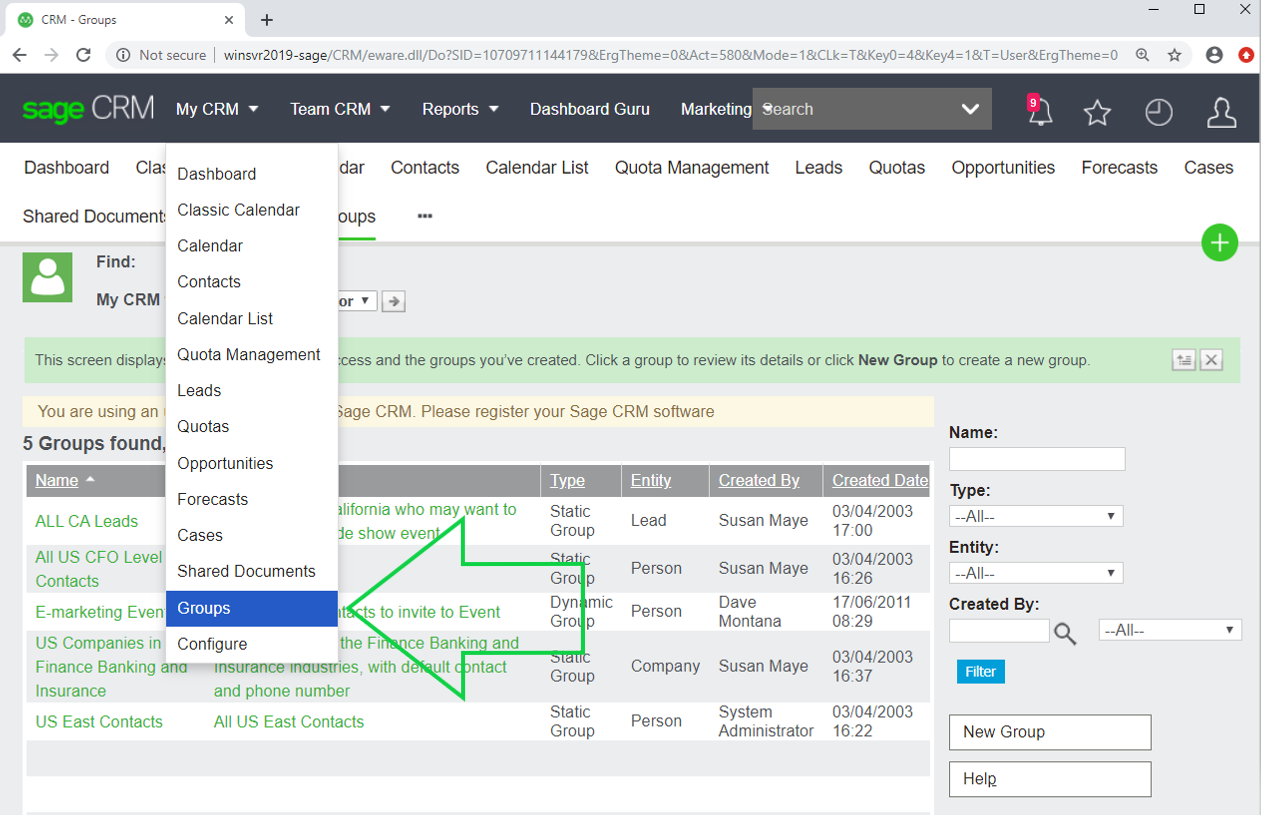
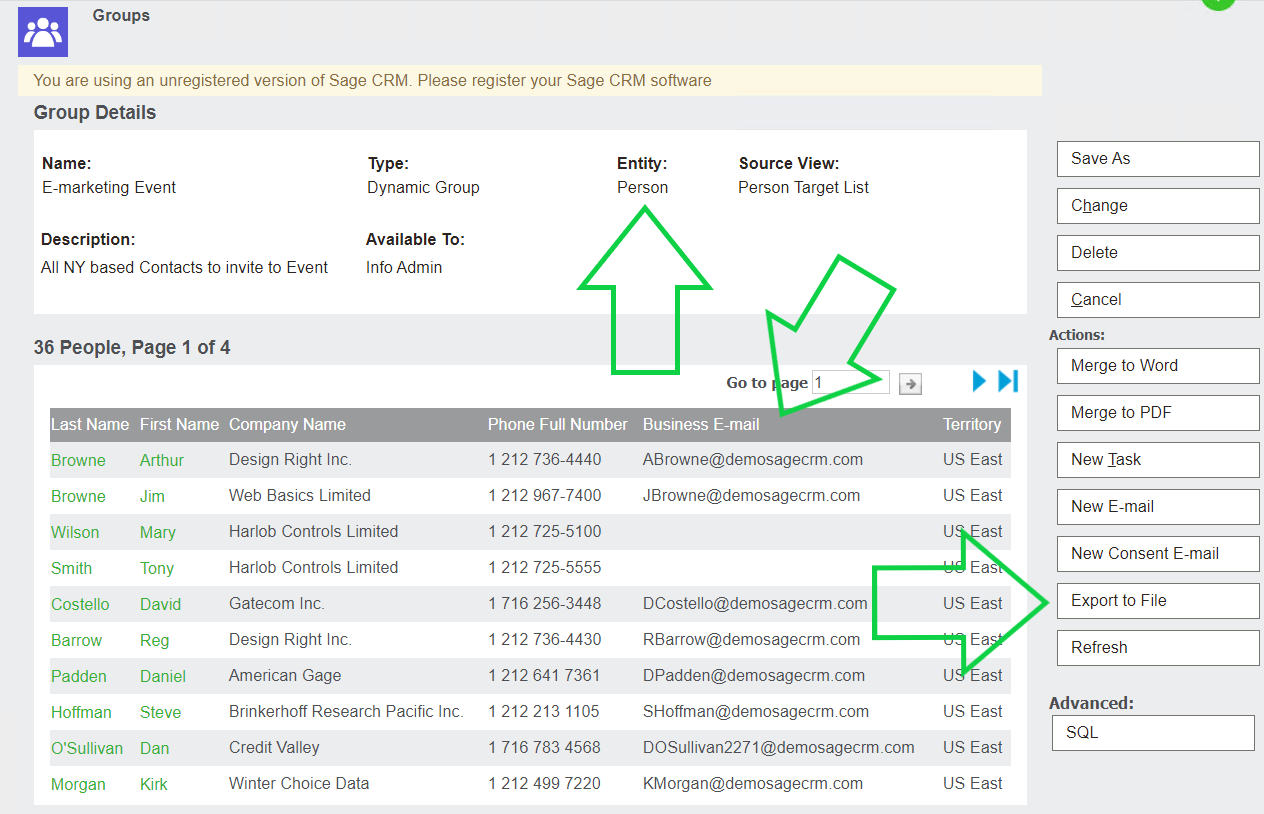
2. Select or create a Person Group that displays email addresses.
3. Click Export to File:
Export contacts and email addresses using Sage CRM reports
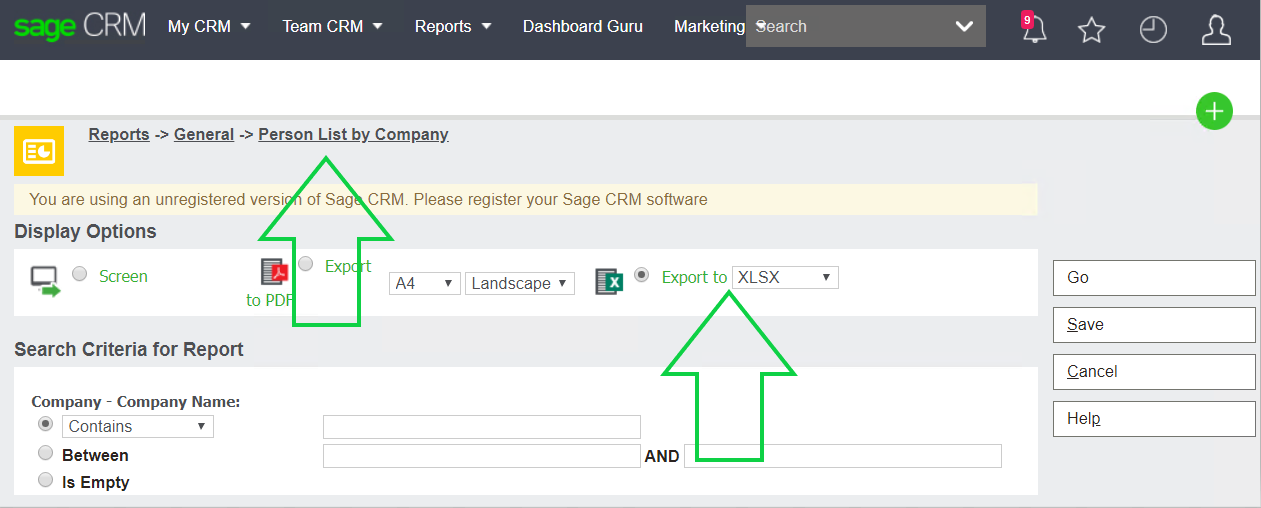
1. Navigate to Reports > General:
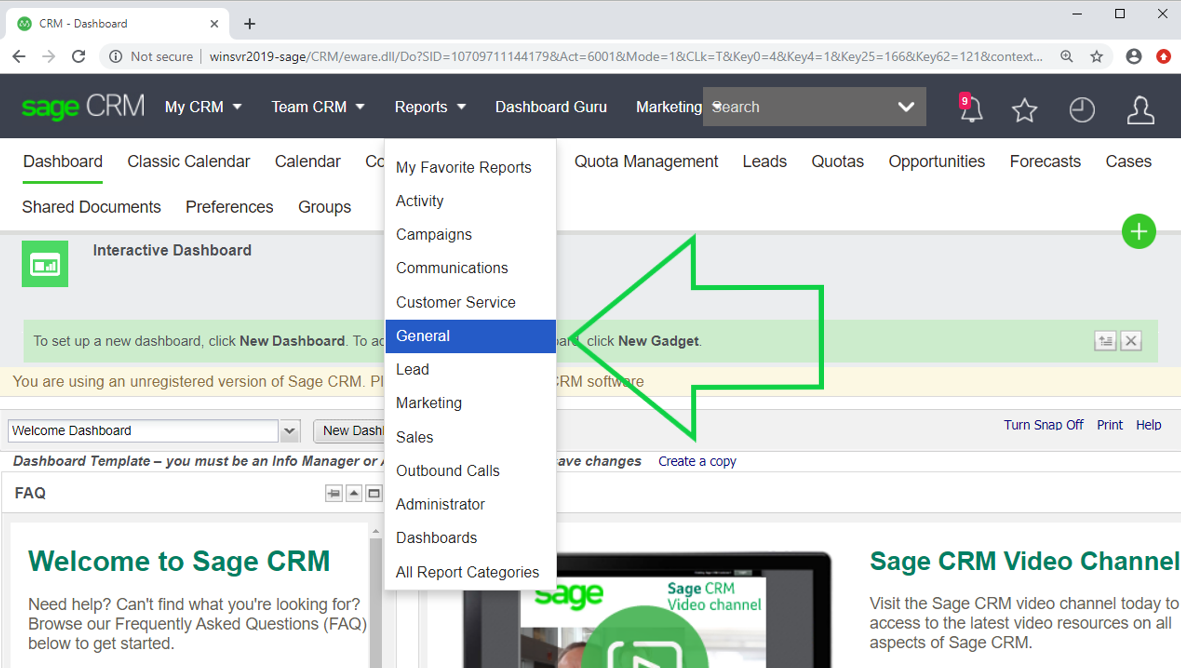
2. Select a Person List with email addresses.
3. Set Export to XLSX, then click Go.
Return to Top
One Trick How To Find and Clean Sage CRM Duplicate Data
We recently helped a client investigate some duplicate data in their Sage CRM environment. They were looking to apply several patches (they were behind on patching) and their system is very heavily customized, so we wanted to test the customizations out after each patch was applied.
After installing one of the patches, we noticed that a large number of Person records were showing up twice in the Person Find page. When hovering over the Person Last Name link column in the results grid, We verified that the records were in fact duplicates because of the identical Key2 field in the query string.
We dug a little further by going into SQL Management Studio and running some queries. We know that the Person Find page used vSearchListPerson to gather its data, so we ran a query against that view.
Sure enough, the data was duplicated in the query results.
The next step was to pinpoint what table in the view had ambiguous information, so we had a look at the view contents. The view is based on the Person table and links in CRMEmailPhoneData (for the Person), Company, CRMEmailPhoneData (for the Company) and Address. I first checked CRMEmailPhoneData for the Person by running a query with the following parameters: epd_EntityID = 13 AND epd_RecordID = XXX (we arbitrarily chose a PersonID that was showing as a duplicate in the vSearchListPerson view).
Two records were returned in my query, so we knew we found the source of the duplicate data. Now I needed to figure out why two CRMEmailPhoneData records existed for so many Person records in the system.
In the two CRMEmailPhoneData records returned in my query, we noticed that they had different values in epd_EmailID. So the next step was to run a query against the Email table passing in the two values from CRMEmailPhoneData.
What we found here was that the newer CRMEmailPhoneData record pointed to an Email record that was flagged for deletion (Emai_Deleted = 1). Subsequent CRMEmailPhoneData examples showed the same phenomenon. Most of the examples were with deleted Email records, but there were some related to deleted Phone records too.
We restored a separate dataset in SQL from before patch D was applied and discovered that these duplicate CRMEmailPhoneData records did not exist. So it was easy to deduce that the patch caused this issue.
How can this be avoided? The short answer is to purge all deleted records (xxxx_Deleted = 1) from the following tables prior to running any patches:
- EmailLink
- Phone
- PhoneLink
Be aware that this may require the temporary removal of a Foreign Key restraint on the Link tables.
Return to Top
How to Configure Sage CRM Match Rules
The One Warning That Will Save You Hours Of Work: Match Rules For Sage CRM
We all know that data entry isn’t perfect and Sage CRM data is no exception to the rule. One user may type “ABC Company” and another may type “ABC Co.” This can and may create duplicate records in the system that will eventually need to be merged.
In order to prevent this kind of data duplication in CRM, the Deduplication feature must be turned on. Match rules can be created on both the Company and Person entities, warning users that they may be entering a duplicate record. Furthermore, data uploads also honor match rules and allow for interactive or batch data processing.
Following this example, you will setup match rules on the Company entity that match using a “Contains” on the Company Name and “Contains” on the phone number.
NOTE: Using the “Contains” searches for the value of the name or the phone contained in the existing data.
- To turn on the Deduplication feature. Login to Sage CRM as an administrator and go to Administration | System | System Behavior | click on Change | and set the Deduplication value to “Yes” | and Save.
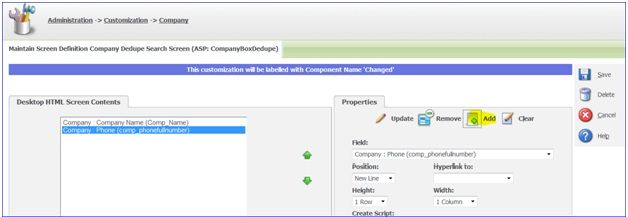
- Now go to Administration | Customization | Company | Screens (tab) and select the Company Dedupe Search Screen. Find the Company: Phone (comp_phonefullnumber) from the drop down list and click on “Add” | and Save.
- Lastly, go to Administration | Data Management | Match Rules | Company | Continue | and click on New. Choose comp_phonefullnumber as the Match Field and “Contains” as the Match Type | and Save. If you don’t already have a match rule setup for Match Field comp_name and “Contains” as the Match Type, create one.
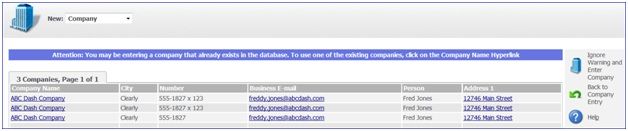
- Once you’ve setup your match rules, try testing them. Click back out to the Main Menu and right click on the New fly-out menu, then click on Company. Enter a known company’s name and phone number to test and click on “Enter Company Details”. If the system finds matching records you will receive a warning and have the ability to choose an existing record at that time.


Although you can’t avoid all human error and data integrity problems, match rules can at least catch a good majority of them. They give you the option of continuing with your entry and do not prohibit in any way the entry of a new record with the same exact values. Now that you’ve learned how to setup match rules on the Company entity, you can do the same for the Person entity. Good luck!
Return to Top
How to Merge Companies in Sage CRM
You’ve all found yourselves in the situation when you look up a Company in CRM, ABC Accounting for example, and you find two results (or more) A.B.C. Accounting, or even ABC Acctng. The possibilities are endless and, without tight de-duplication rules, inevitable.
Why?
We all enter data differently, the way in which you personally anticipate it’s easiest to find. This method isn’t successful when you have several people with different ideas of ‘simple’ entering data into CRM. When you find duplicates in Sage CRM, you have the luxury of being able to merge the data. This merge combines all information under the company including (but not limited to): communications, people and addresses.
Let’s take a look at the technical side of things: What really happens in a mail merge?
In a mail merge, the source company (the secondary company merged into the destination company) is deleted. This is important to remember. An accidental merge of two companies (without a lot of back end programming) can only be reversed by restoring an entire Sage CRM backup. Hopefully, your backups are functioning properly, but that’s a whole separate issue…
With that said, don’t worry. The ability to perform a mail merge is purely a User right. Most organizations designate one or two key people that have the right to perform this task using the instructions below.
A mail merge walk-through:
- Backup! Backup! Backup! I can’t stress the importance of a daily SQL routine and manual backups! Prior to performing any ‘significant’ task in CRM, such as Territory Rebalancing, Merging records or performing Mass Updates.
- Find the destination record or what I call ‘The Keeper’. This is going to be the base record into which the source record is merged. Choose the record with the better data. If you are integrated with an ERP solution, select the record that is directly linked. Click on Change.
- You will notice the Merge Company button in the Action Button group on the right. *If you don’t, you do not have the User Right to merge companies. Consult your administrator.
- Once you select the Source Company (by typing or clicking on the magnifying glass) then click on Merge Company (again). This will merge both records. Wait for the records to successfully merge before clicking on another button. That is, be patient and do not click again until the screen refreshes to avoid any problems.
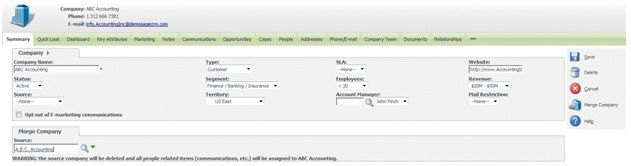
As you can see, merging companies is both powerful and simple. It resolves inevitable data entry mistakes while saving you and your team the time it takes to manually re-enter each entry. Take advantage of this great tool, but as always, be careful and proceed with caution.
*Remember, you can perform this same action with Person records!
Return to Top
Keep Your Sage CRM Database Running Efficiently with SQL Maintenance
Keep Your Sage CRM Database Running Efficiently with a SQL Maintenance Plan
Once you have your CRM system up and running, you need to keep your data protected from any unforeseen server issues and make sure you can keep your system running smoothly. Setting up the proper SQL Maintenance plan can do both of these. I highly recommend you work with your IT staff or contractor to setup the best plan for you. In this article I will give you some of the recommended items to add to your SQL Maintenance plan. While you may want to create a maintenance plan to run weekly for normal cleanup and a different maintenance plan to run monthly to run offsite backups, I am just going to cover an example of a weekly cleanup plan.
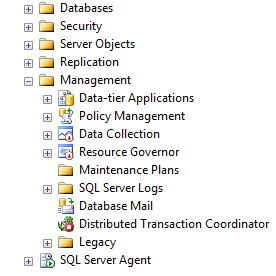
To get started, you need to open SQL Management studios and connect to your Sage CRM database server. Once you are logged in, expand Management, right click on Maintenance Plan, and select New Maintenance Plan. Name the new maintenance plan ‘Sage CRM Weekly Plan’.
 On the right side, you should see a calendar icon. Click on the icon to configure the weekly time to run your maintenance plan. Setting your plan to run very early in the morning or late at night on a weekend is best to avoid slowing down the system during prime usage times.
Now that your schedule is set up you need to start to add tasks to your maintenance plan. On the bottom part of the screen, you will see ‘To Build a subplan, drag task from the Maintenance Task toolbox to the designer surface’. To add items to your maintenance plan, simply drag and drop items from the tool bar on the left.
The first item we want to add to our maintenance plan is Rebuilding Index Task. This task will go through all the indexes your CRM database is using and rebuild them to include all new records that have been added since the last rebuilding of indexes. This will lower your fragmentation significantly. Fragmentation is caused when there are records in the table that should be indexed but are currently not in the index. This can slow down performance a great deal when using Sage CRM. After you have added the rebuild indexes task, right click on the task and click on edit. In the database drop down, select your CRM database and click on ok. Then click on ok again.
Next we want to add Reorganize Index to our list. Drag and drop Reorganize Index Task into the designer surface. Now we need to make sure it runs after the Rebuild Index Task. Drag the green arrow that is below the Rebuild Index task to the top of the Reorganize Index Task. This will force the task to run in order.
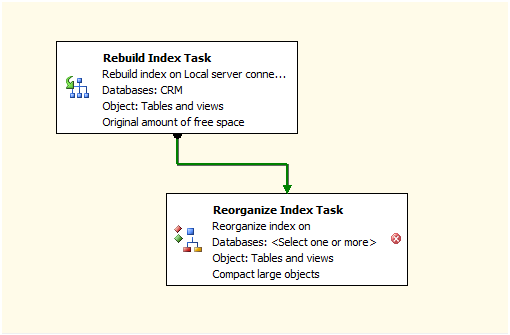
Right click on the Reorganize Index Task, select edit and then select your CRM database.
Reorganizing Index Task is very similar to the Rebuild Index Task. While Rebuild Index will completely remove and recreate all your indexes, the Reorganize will simply add new records to your index and properly organize it to help with performance. Rebuild is often used when the index has very high fragmentation, over 40%. Reorganize is used for lower fragmentation, 5-40%. Rebuild index does run a lot slower and use a lot more resources. It can leave your database locked and unusable while it runs. If your maintenance plan is going to be running when no users are in the system, you may only need to have the Rebuild Index Task in your maintenance plan. If your Sage CRM system is being used 24 hours a day and 7 days a week there may not be a good time to stop production each week to let the indexes rebuild completely, so in this case you can have your indexes reorganized weekly and then you can add your index rebuilding to a monthly plan.
The last item we want to add is Execute T-SQL Statement Task. Drag and drop this task to your designer surface and then make the green arrow under Reorganize Index Task point to Execute T-SQL Statement Task.
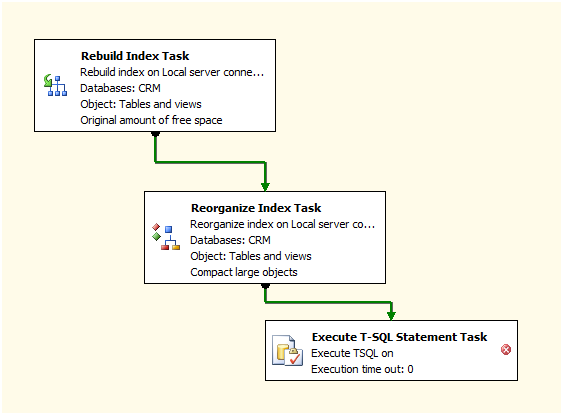
Now right click on the Execute T-SQL Statement Task and select Edit. Add in the following code.
NOTE: This code assumes that your database is called CRM.
[sourcecode language=”sql”]
Use CRM
Go
ALTER DATABASE CRM SET RECOVERY SIMPLE WITH NO_WAIT
DBCC SHRINKFILE(CRM_log, 1)
ALTER DATABASE CRM SET RECOVERY FULL WITH NO_WAIT
[/sourcecode]
This code will shrink the SQL log file for your CRM database. If this file is allowed to grow without being shrunk it can take up a very large amount of space on your SQL server. This will eventually cause severe slowness and errors to appear in Sage CRM. Once you have added this code, you can click on Ok, and save your Maintenance task.
These are three of the main tasks used to help speed up Sage CRM, and keep the indexes and log file cleaned up. They are not the only tasks I recommend you setup. You will need to work closely with your IT staff or contractor to setup onsite and offsite backups on a regular basis to keep a server crash from setting you back several days, weeks, or even months.
Return to Top
What to Do After a Sage CRM Database Move
Learn how database server migration affects Sage CRM and the necessary steps to do within Sage CRM after the database is migrated to a different server.
Typically, server hardware is upgraded every few years. Sometimes servers just go down and have to be replaced. When either of these situations happens, databases have to be migrated to the new server. After databases are migrated, application software has to be updated to point to the new hardware. This article details the necessary steps that need to be taken within Sage CRM after the database is migrated to a different server.
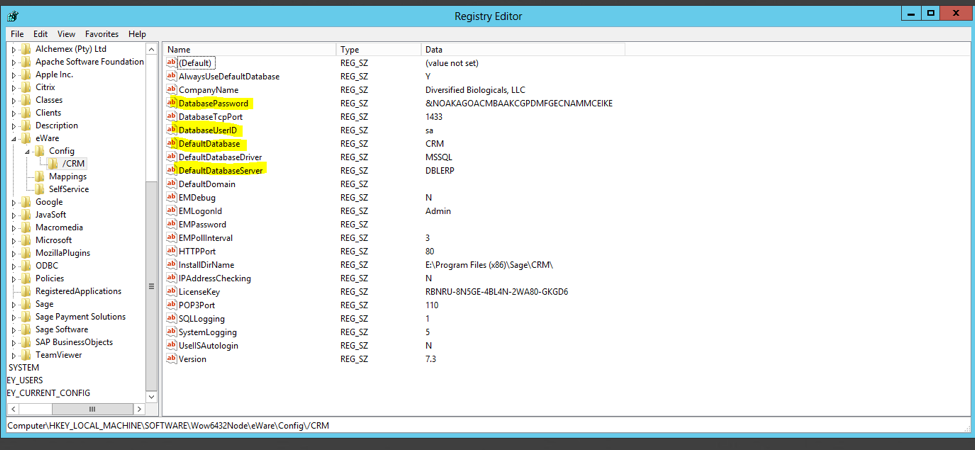
- Open the Registry Editor and change the following parameters accordingly. The password can be typed in plain text mode.
- Go to the following application path and open the db.properties file and adjust the following parameters accordingly. The password can be typed in plain text mode.
db.url=jdbc:log4jdbc:jtds:sqlserver://[SQLservername]:[port]/databasename;language=english;
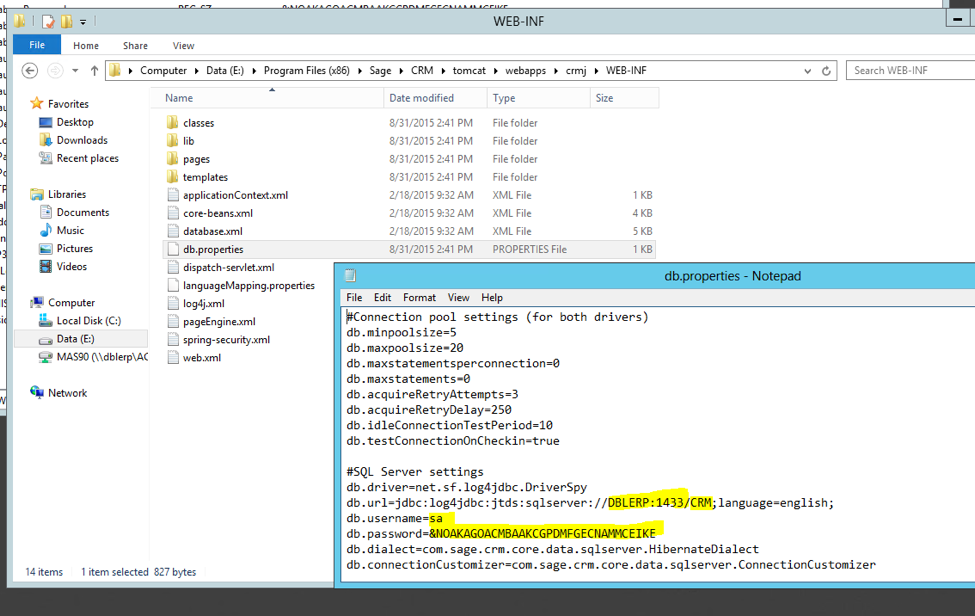
After saving the changes, reset IIS in the application server.
Now you should be able to login to CRM.
Encrypting the SQL Password:
The SQL password can be encrypted in registry by going into following area,
- Back up the db.properties file.
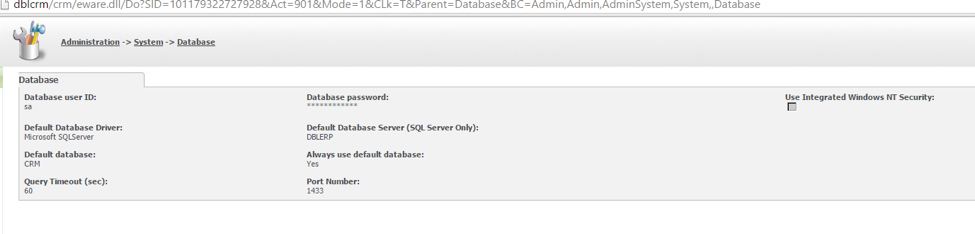
- Type the new SQL credentials in screen below and save. The screen is accessed via Administration -> System-> Database.
- Change the SQL password in the backed up properties file to encrypted password and save.
- Then copy the encrypted password from the registry area shown in the screenshot above.
- Now replace the original db.properties file with the updated file.
- Reset IIS.
If the Sage CRM Application Server has also changed, make sure to follow below steps in the SQL database.
- Open the SQL Management Studio and connect to CRM database.
- Run the following query.
Update Custom_Sysparams set parm_value = ‘[new servername];’ where parm_name = ‘Servernames’
- Reset IIS.
