Table of Contents
Sage CRM Self-Service Portal Overview
Key Benefits of Sage CRM Portal
How to Get Your Sage CRM Self Service Portal Running In 5 Easy Steps
How To Use Sage CRM Search Select Fields In Your Portal
Sage CRM Self-Service Portal Overview
Giving your customers, partners, and vendors secure access to important data within your Sage CRM system allows you to further streamline your operations and build high quality, satisfactory, repeat business across your organization.
The Sage CRM Self-Service Portal is designed to do just that and is a great benefit to any company using Sage CRM.
With the out-of-the-box functionality in the Sage CRM Portal, you can securely share key information to anyone outside your CRM users group who needs access to your CRM data. The convenience, time and money saved for you and your customers make it a no-brainer.
Possibly best of all: it’s included with your license of Sage CRM – apart from setup and configuration, there is no additional charge to using the Portal!
An Always On, Always Available Extension to Your People
In essence, the Sage CRM Portal allows you to create an extension of your people through the use of portals. Your portal allows your team to deliver information to outside parties while tracking and managing activity in Sage CRM.
With the Portal, you provide your customers, vendors, partners and other third-parties controlled access to relevant Sage CRM data so they can stay updated on their cases, tasks, projects, opportunities, or other information that you choose to share. You control what they see and allow them to access information related only to them.
The Self-Service Portal is designed to use key elements of the Sage CRM user interface with a completely customizable interface. Building the portal is like assembling a kit from building blocks – you pick and choose pieces of Sage CRM functionality to share via the Portal interface.
You can make it look and feel as you wish.
Some of our past Self-Service projects have used the out-of-the-box Sage CRM look and feel, while others have been customized to seamlessly integrate with our clients’ corporate websites using style sheets and images.
Common Ways Portals are Used
Here are a few common ways outside third-parties might use your portal in a self-servcie manner:
- Requesting information or product literature
- Updating addresses or primary contact information
- Requesting customer service
- Tracking shipments or order history
- Reviewing purchasing history
The Customer Portal
A Customer Self-Service portal is the most common type of portal. Imagine it being similar to what Amazon offers. It allows your customers to have access to information they want, when they want it.
If your office hours are 9 to 5, your customers can use the portal to access key information long after you close. This makes working with you and your team much more convenient to them.
Plus customers can share information that feeds right into CRM, such as updated contact information, billing details, support requests, and more, so you will always be in sync with your customer base.
From a customer service standpoint, this is a great value.
You can share 24 x 7 x 365 access to service request status, past orders, order invoices and shipment history. In our busy world, your customers want answers to their questions immediately. the portal allows them to actually see their information when they need it.
As more of your customers use this self-service access, you will see the added advantage that your people will have more time free to spend on higher value services which should increase revenue.
Other Uses
Portals can be used for a wide variety of means. The sky is the limit. Consider the power of the portal anywhere that you have key information that you would like to securely share with trusted outside parties 24 x 7 x 365 to give them convenient self-service access.
Here are some quick ideas designed to get you thinking:
- Sharing marketing literature
- Sharing product specification and installation guides
- Sharing project status
- Provide forms and paperwork
- Provide a list of authorized agents
Not sure a portal is right for you? Please reach out – we are happy to discuss!
Return to Top
Key Benefits of Sage CRM Portal
The number one reason to implement the Sage CRM portal is to improve your bottom line. In these trying economic times this can be a major struggle for any business. The power of a Sage CRM portal gives you to ability to automate features so you can focus on the big picture. Here are some quick tips on how a Sage CRM can help you accomplish your financial goals:
- Minimal Setup Cost
- Minimal Maintenance
- 24-Hour Access
- Alerts
- Real-Time Updates
Requires little to no costs once setup. The Sage CRM portal runs as a website: once it’s setup, there is no ongoing cost.
Requires little to no employee maintenance. Unless someone from your internal team is adding enhancements or your server crashes, there is no need to staff someone to monitor the portal.
Gives your customers 24-hour access to their accounts in your Sage CRM system – whenever your customer wants to know. Since the Sage CRM portal runs as a website and is found on the Internet, your customers can login at any time, day or night, to get access to previous orders, open orders, service issues, service requests, etc.
Sends your employees and/or account managers alerts when your customers make changes to their account. You can choose to have the Sage CRM portal send updates through text messages or e-mails, or notifications from within Sage CRM, so that your staff stays on top of what their customers are doing.
Updates your internal Sage CRM system in real-time. As soon as your customer makes changes to their account, your employees will see the changes in Sage CRM immediately. There is no “sweep” at the end of the day to grab all of that data and no need for other integration pieces. It automatically updates your internal Sage CRM system.
These elements help ensure your Sage CRM Portal delivers the maximum accessibility to your trusted ecosystem for a minimum cost.
Return to Top
How to Get Your Sage CRM Self Service Portal Running In 5 Easy Steps
Get up and running with your Sage CRM Self Service portal with these 5 easy steps:
1. When the Sage CRM (SageCRM) install runs you should see something similar to the image below. Check off “Sample Self Service support site”. This will put some sample program files in your Sage CRM install specifically for self-service, create an extra database for self-service visitors and create an IIS application for the self-service site (this is a separate “Website” from Sage CRM). If you need to rename the IIS application (it is by default named “CRMSelfServiceDemo”), create a new IIS application with a new name and copy the files over. Restart IIS.

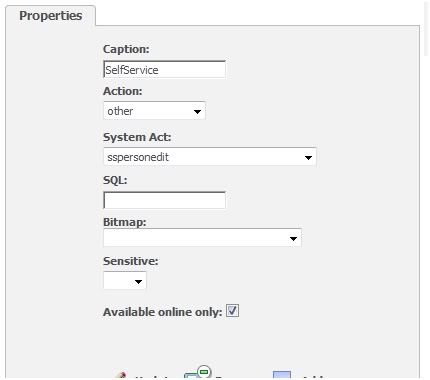
2. Create a new tab in the person entity (you can also do this for companies), call it “SelfService” then select the “sspersonedit” system action from the dropdown list.
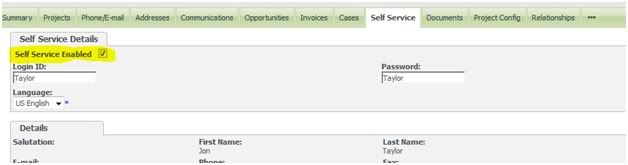
3. Activate a user for self-service by looking up the user, going to their Self Service Details tab, checking Self Service Enabled and clicking Save. This will allow access into the self-service site for this particular user. If you need to remove access, just check the checkbox and make sure you save the page.
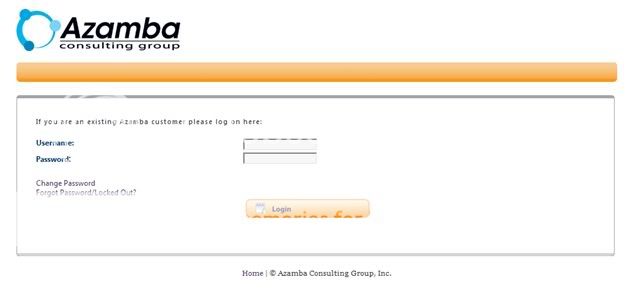
4. Navigate to http://localhost/crmselfservicedemo (or the URL to your renamed application) to view the out-of-the-box sign in page. In our particular case, we have customized our login screen with some simple color changes and our company logo. The look of Sage CRM self-service can be fully customized to your company look. The pages are ASP and use CSS and Javascript to complete the functionality.
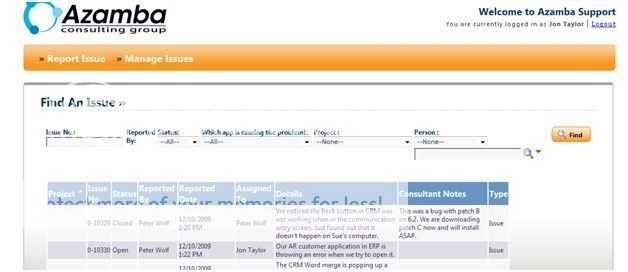
5. Use your credentials to test the login. You can see after I’ve logged in I only see the information that is specific to me as a customer. We have customized our self-service portal to manage only cases. I put a Find An Issue screen as well as a grid on our main self-service page so clients can filter for their own issues and keep themselves apprised of the case statuses
Return to Top
How To Use Sage CRM Search Select Fields In Your Portal
Sage CRM Self-Service is an excellent tool to allow your customers to access their accounts or for prospective customers to let you know that they are interested in your products. When developing your Sage CRM Self-Service portal, you will notice that almost the entire eWare object model is available to you from the portal.
You can add lists, entry screens and search screens. You can even call an authentication property that checks to make sure that the user is logged into your site.
There are, however, a few field types that do not render well in the browser when using Sage CRM Self-Service. Search Select Advanced fields are one of these.
There are Javascript functions and DHTML calls inserted into the frames on the CRM side that control those field types and they are not available in Self-Service. This is mainly because Sage CRM Self-Service is not frame-based but rather just a collection of individual ASP pages.
The eWare object actually does render Search Select Advanced fields on the page but the functions available to that field are not available in the portal so the field is not able to get data it needs to fill the field.
There is a workaround, however.
You can substitute a standard HTML dropdown list in place of the Search Select Advanced field and fill it with the values you need. To ensure it saves correctly input each dropdown option with the ID of the record that it references.
Here’s some sample code:
[sourcecode language="jscript"]
// The field below (“xxxx_divisionid”) is the Search Select Advanced field from within CRM
fldDiv = blkEntry.GetEntry("xxxx_divisionid");
fldDiv.Required = true;
var sValues = "<select id="division" name="xxxx_divisionid" size="1">";</select>
var recDiv = eWare.FindRecord("Division","xxxx_recordid=" + YourFilterVariable);
recDiv.OrderBy = "xxxx_name";
var blnNoSave = 0;
while (!recDiv.eof)
    {
        sValues += "" + recDiv.xxxx_name + "";
    }

recDiv.NextRecord();

sValues +="";
fldDiv.ReadOnly = true;
fldDiv.NewLine = false;
fldDiv.Caption = eWare.GetTrans("ColNames","xxxx_Name") + ":<br />" + sValues;
[/sourcecode]
That’s all there is to it. Now you have recreated the Search Select Advanced field in the Sage CRM Self-Service Portal. The data will save correctly and the field will still render as a Search Select Advanced field inside of Sage CRM!