Table of Contents
5 Preferences You NEED To Change Before Using Sage CRM
5 Simple Ways To Make Sage CRM Run Faster
How to Create a Sage CRM User Template
How To Assign Account Managers Using 3 Easy Steps In Sage CRM
How to Create an Email Signature in Sage CRM
5 Preferences You NEED To Change Before Using Sage CRM
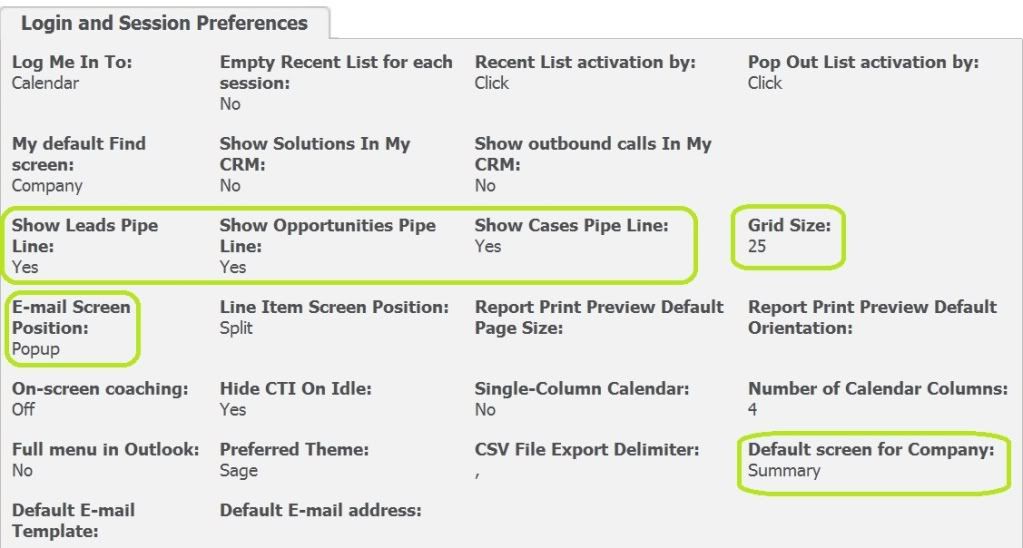
All of your preferences can be found and adjusted under MyCRM | Preferences. If you don’t see this tab your system administrator may have revoked this right from you.
In which case, I’m sorry :(.
Make the five changes listed below to personalize your Sage CRM and make your life easier. You can always change them back.
- Set your time zone!
There’s nothing more embarrassing than showing up to a meeting in Denver on New York time. Sage CRM (SageCRM) will honor and adjust your time settings and display them to other users in the converted time. Your 10 AM will appear as their 8 AM correctly.
- Reveal your pipelines!
One of the most, dare we say, “fun” parts of opportunity/sale and case tracking is getting to see them in a colored/interactive/visual format. Be sure to set all three to the “On” position.
- Max out that Grid Size to 25!
Every time you get search results or see a list of communications / people / opportunities / cases / you name it, it’s encased in what’s called a grid. By default Sage CRM sets this size to 10 but your screen can easily handle 25 results. This change saves you from having to right arrow/page through results as often.
- Set the E-mail Screen Position to Pop-up.
We can’t stress this enough. If you haven’t already changed this setting, you will see this strange shadow of an email window lingering at the bottom of your screen wherever you go.
It’s annoying, misplaced and not friendly. By popping the email position to a new window, you can navigate Sage CRM while leaving your email editor open. TRICK: If you have an email window already “popped-up” and then click on another recipient’s email address in Sage CRM, it will add the new email address to the ‘To’ field, thus adding to your recipients on the same message.
- Set the Default Search Screen for Company to Summary!
For those of you who don’t have this setting configured this way, you can thank me later.
Return to Top
5 Simple Ways To Make Sage CRM Run Faster
The most common cause of lowered performance in Sage CRM is an over worked server. There are a few ways to quickly address this problem.
- The first possible solution is as simple as adjusting your business practices.
Running large reports or importing large amounts of data can put a major strain on your server. These tasks will quickly eat up all of your servers RAM and CPUs and cause your users to notice significantly lowered performance. A simple fix for this problem is to have your imports and larger reports run during non-peak work hours. This will allow your server’s resources to focus on work related tasks during the peak hours and to focus on imports and reporting during the hours user are not accessing the system as frequently.
- Another non-technical solution is to adjust the Sage CRM logging levels. In the Sage CRM administration section under system > logging, there are a few options at the top of the screen you can easily adjust to increase performance. For the best performance set the logging levels to the following:
- System Logging Level = 0-Off
- SQL Logging Level = Off
- Query Duration Logging threshold = 0
- .Net Logging = 0-Off
After you adjust the settings you will notice an increase in performance due to Sage CRM no longer logging all of your activity in the log files.
- There are also a few technical solutions to increase your Sage CRM performance. The first is to shrink your SQL log file. You can do this by logging into your SQL Server Management Studios and running a shrink log file query. The queries are slightly different based on the version of SQL server you have. we have included the example for SQL Server 2008. It is recommended to have a SQL expert backup your database before running the queries.
SQL 2008 Shrink Log File:
[sourcecode language=’jscript’]
ALTER DATABASE SET RECOVERY SIMPLE WITH NO_WAIT
DBCC SHRINKFILE(, 1)
ALTER DATABASE SET RECOVERY FULL WITH NO_WAIT
[/sourcecode]
Once the query is complete, right click on your database name in SQL Server Management Studios and click on properties. Go to the file > option on the left and look at the Initial size of the log file, it should be at 1.
- A second technical solution involves upgrading the server that Sage CRM or SQL Server resides on.
If you find that the Sage CRM or SQL server is constantly running at full capacity, it may be time to upgrade the hardware. A good way to check how hard your server is working is to log into your server, either Sage CRM or SQL, right click on the task bar at the bottom and click on ‘Start Task Manager’. Once it’s open, click on the performance tab. You can quickly see how much of the CPU and memory is being used by the indicators on the left side.
If they are both constantly near the top, it’s time to upgrade. While upgrading the CPU can be costly, it’s relatively inexpensive to add more or even double the current RAM on the server.
- An alternate and very useful solution that we recommend is our own CRM Tune-up Wizard. This performs the shrink log file and sets the Sage CRM settings for you automatically.
The SQL Tuning Tool also performs some field and view modifications to greatly increase performance as well as rebuild all the old indexes in your CRM database.
This tool is very handy for performing a lot of technical tasks to increase performance by simply clicking a button in the Sage CRM administration area.
After completing all or some of the tasks, you should notice a much faster system for you and your team as they navigate through Sage CRM.
Return to Top
How to Create a Sage CRM User Template
You have numerous employees that you need to set up user profiles for in CRM. They range from accounts payable to warehouse and you don’t have the time to go through the new user setup steps for each one. You need an easy way to manage user setup.
Sage CRM allows you to make user templates to save time entering new users, and by following the directions outlined in this article you will be able to successfully create multiple user templates to quickly add new users into Sage CRM.
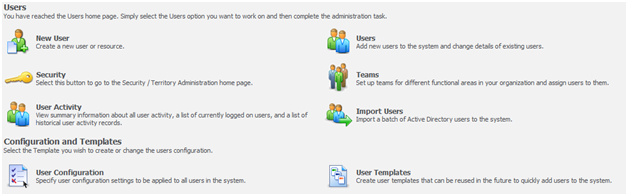
In order to create a user template you must be logged in as a user with administrative privileges. Select the Administration menu button to bring up the administrative menu and click on the Users option. The User Templates option is located under the Configuration and Templates section of the Users screen.
You need to select the New action button on the right side of the User Template screen to begin the process of creating a template. Enter the name for your new template in the required field. If you want to base the new template on an existing template you created, then select the name of the template from the drop down list under in the Based On Template field.
If you have already set up your teams and territories then you can select the options under Primary Team and Home Territory as the default choices. You can change these values for each user that you assign to this template. Make sure that the License type matches the user license you purchased.

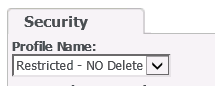
You can proceed to the second step of creating a user template by selecting the Continue action button on the right side of the screen. Step two involves entering additional user details and selecting the default security settings for users assigned to the new template. If you have already set your user security profiles, then you have the opportunity to select a security profile from the drop down list that will fill in the desired values for the security fields.
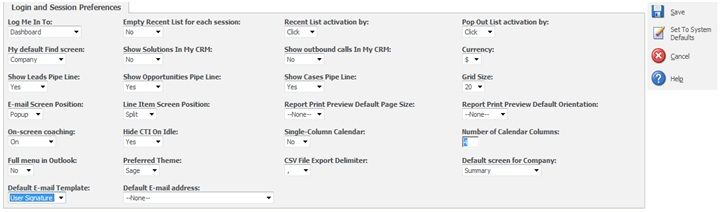
When you finish entering in the desired security settings, you will need to click the Continue button on the right side of the screen to proceed to step three. Step three allows you to set the login and session preferences that may also be found on the Preferences tab in the MyCRM area for a user.
It is important to note that the default date and time preferences may also be set for users assigned to this template. These settings may be changed by individual users to suit their own needs when they log on to CRM.
You must select the Save action button on the right side of the screen to complete the process and begin assigning new users to this specific user template.
Return to Top
How To Assign Account Managers Using 3 Easy Steps In Sage CRM
When it comes to sifting through data bit by bit and performing updates, most of us run for the hills. Data cleanup and integrity verification can be very tedious and time consuming. When it comes to the situation, for example, of having to assign all companies in Sage CRM in a particular state to a specific Account Manager, this is a task nobody wants.
But here’s a trick to make this easy.
Using the Mass Update function in CRM after having created a Group, you can easily assign the Account Managers on all companies quickly and easily.
For this example we will be setting all companies in Sage CRM that are located in London to be assigned to Susan Maye.
- Turn on the Mass Update feature (if it hasn’t already been set to ‘Yes’), by navigating to Administration | System | System Behavior| click on Change | set ‘Allow mass update and update territory’ field to ‘Yes’| Save.
- Create the Group by navigating to Main Menu |Find | Company | (enter) ‘London’ in the City field | click on Find | click on Create New Group | enter ‘Cities in London’ in the Name field | Save.
- Access the Group to perform a mass update by navigating to My CRM | Groups | click on ‘Companies in London’ | click on ‘Mass Update’ | check the ‘Account Manager’ checkbox | Continue | select Susan Maye from the User Select | Save | Ok | Continue.


Success! You have just updated 163 records in 3 easy steps!
Remember that anytime you can create a group of records at once via a Search Screen or via the Groups tab directly in Sage CRM, you can use Mass Update to update a field(s).
Also keep in mind that you can use the Update Territory function the same way that the Mass Update was performed in order to update the territories of records all at once.
Return to Top
How to Create an Email Signature in Sage CRM
Is Your Email Missing Something? 3 Steps To Create An Email Signature In Sage CRM
One of the most frequent questions we’re asked after syncing Outlook and Sage CRM is, “How can I create a company email signature for my employees?”
Here’s how in three easy steps.
Step 1: Navigate to the Email Templates screen and select New Template
In order for you to accomplish this task you need to have administrator rights. Click on the Administration menu button to view the Administrator home page. This will bring up an icon for Email and Document that you need to select to bring up the Email and Documents screen.
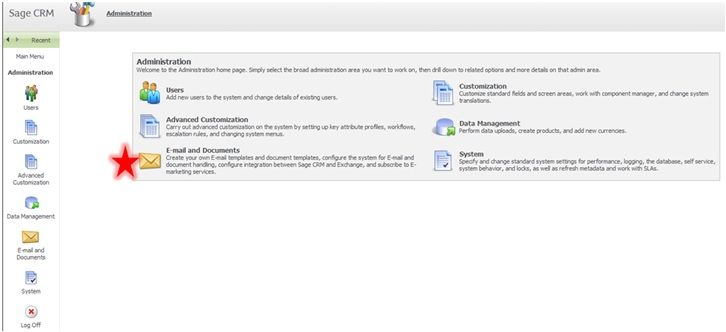
From the Email and Documents screen select the Email Template option. This brings up a list of your current templates and an action button menu on the right side of the screen. Select the New button to create a new template.

Step 2: Create an email template with desired signature
You must create a template name and then make sure that the “All” option is selected in the Entity field. Leave the From and Subject fields blank to let the user fill in later.
Click into the body of the email and put a couple of lines space from the top to allow the user to enter in text in front of the signature. Click the down arrow next to the “Choose Field to insert into the Email” to see your options. Select the “User-First Name” and “User-Last Name” for the first line of your signature. It should look something like this:
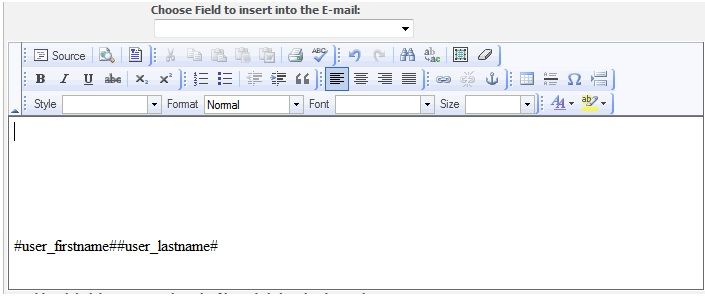
These fields will automatically display the current user’s first and last name. You might want to also add the user’s title, phone number, email and the name of the company so your recipients can easily contact with a glance at your email.
If your company has a logo that you would like to put in the signature, simply click the Browse button to locate the image and then click the “Upload inline image” button to add the logo to the signature. When you are finished creating your signature, select the Save action button and it will take you back to the Email Template screen.
Step 3: Set user’s default email template
You can set the new template to be the default for all users.
First, click the Users menu button to bring up the User screen. If you have already entered in all of the users for the company, select Users from the menu to change details for existing users.
Select a hyperlink to bring up that user’s profile by clicking on their last name or icon. Navigate to the User’s Preferences by click the User Preferences tab at the top of the screen. Select the Change action button and find the “Default E-mail Template” field. Choose the template you just created with the signature and press the Save action button.
You can repeat the process for all your users to make sure everybody has the newly created signature as their default template. Consistency with email signatures across your company is one the most basic steps to a professional appearance.